displaying posts 151 to 175 of 254

Pages (11): first .. 6 [7] 8 .. last

Author Subject: 306 Maxi project
jonbb

Newbie

Location: pamplona

Registered: 01 Jul 2017

Posts: 21

Status: Offline

Post #151
Hi, I'm sorry for not knowing English and having to go with the translator, I'm jon
The thing is that I have a project similar to yours and I have many problems to do it and I'm lost.
The engine was an xsi and now I'm getting the s16 167cv 6 speed. The rfs.
The thing is that I have to modify suspension shorter because if not the car was very high because of the fins so tall that it has and there is to cover the gap. The problem is that it goes down well but the stick or transmission remain in "v". And what I want is to raise the engine about 2 cm but I thought spinning would also raise the transmission. If you could give me a cable, I would appreciate it
I congratulate you first on the project and a pleasure to meet you.
I am from pays basque in spain.
I have seen or it seems to me in a photo that you have that your transmission of the box comes more arriva or it seems to me.
Apart I want to get cups and put longer blades and longer mangue as some Ford. we are in contact. regards
Posted 10th Aug 2017 at 21:19
RallyeRed

Regular

Location: Northwich

Registered: 03 May 2016

Posts: 353

Status: Offline

Post #152
Hi Jon
Have pm'd you, but I'm afraid I can't help with your issue.
Cheers
Iain
Posted 11th Aug 2017 at 10:43
jonbb

Newbie

Location: pamplona

Registered: 01 Jul 2017

Posts: 21

Status: Offline

Post #153
Hello could you contact by email or otherwise? You tell me private thanks
Posted 11th Aug 2017 at 14:25
welshpug!

Capt Pedantic

Location: Bigend, Wales.

Registered: 27 Mar 2007

Posts: 25,839

Status: Offline

Post #154
They are meant to be high in the arches as they are a rally car, so will have long travel suspension, the engine position was not changed in the rally cars as far as I know at all.

________________________________________

need a part number? get on here - http://public.servicebox.peugeot.com

Bring on the Trumpets.

Posted 11th Aug 2017 at 14:37
jonbb

Newbie

Location: pamplona

Registered: 01 Jul 2017

Posts: 21

Status: Offline

Post #155
Hi. I know the engine does not move it. What happens is that these cars carry sequential gearbox and the output of the transmission shaft of the high hand. The thing is how to adapt that to a box changes of a s16 of 6 speeds of series
Posted 11th Aug 2017 at 14:50
gnrlee Forum Admin

Location: Leeds

Registered: 20 Aug 2005

Posts: 8,882

Status: Offline

Post #156
Have you tubbed your inner arches so that you can get suspention that will allow go much lower?

________________________________________

Proud Member of the ASTOR Owners Club
Posted 11th Aug 2017 at 14:52
jonbb

Newbie

Location: pamplona

Registered: 01 Jul 2017

Posts: 21

Status: Offline

Post #157
Hello you know where they sell some kit of arms sleeves rods etc that are not the original type dimma economic?
Posted 13th Aug 2017 at 09:36
welshpug!

Capt Pedantic

Location: Bigend, Wales.

Registered: 27 Mar 2007

Posts: 25,839

Status: Offline

Post #158
http://www.satchellengineering.co.uk/

https://www.maximotorsport.com/products.php?directory=products/Peugeot/Peugeot%20306

________________________________________

need a part number? get on here - http://public.servicebox.peugeot.com

Bring on the Trumpets.

Posted 13th Aug 2017 at 12:19
RallyeRed

Regular

Location: Northwich

Registered: 03 May 2016

Posts: 353

Status: Offline

Post #159
jonbb wrote:
Hello you know where they sell some kit of arms sleeves rods etc that are not the original type dimma economic?


Jon I don't think your translator is working well. It's hard to understand your questions sometimes, but often the answers to your questions in various maxi threads are in the threads themselves.
Can I recommend you start your own thread with your questions please, rather than here?
Thanks
Iain
Posted 14th Aug 2017 at 10:01
jonbb

Newbie

Location: pamplona

Registered: 01 Jul 2017

Posts: 21

Status: Offline

Post #160
Hi. Sorry can be the translator I'll open another page with my problems. But that nothing wanted to know how you will widen from pivot trapezes or arms. The black arms of the photo are yours?
Where or on what page do you buy the material? Could you pass Link to buy? thanks for everything. And eborabuhena for your great project.
Posted 14th Aug 2017 at 13:15
jonbb

Newbie

Location: pamplona

Registered: 01 Jul 2017

Posts: 21

Status: Offline

Post #161
Congratulations on your project meant. forgives
Posted 14th Aug 2017 at 13:18
RallyeRed

Regular

Location: Northwich

Registered: 03 May 2016

Posts: 353

Status: Offline

Post #162
Jon, Alan Dent made them for me;
http://www.alachi57.com/6.html
Contact him and ask for "double adjustable 306 maxi width wishbones" the same as mine.
You will need to know if you have 16 or 18mm ball joint pin on your uprights.

He also sells track rod extenders for your steering arms if you need them.

Cheers
Iain
Posted 14th Aug 2017 at 20:36
jonbb

Newbie

Location: pamplona

Registered: 01 Jul 2017

Posts: 21

Status: Offline

Post #163
thank you handsome. I look at it, thank you.
Posted 14th Aug 2017 at 21:18
devere

Senior User

Location: Saxtead

Registered: 16 Dec 2008

Posts: 810

Status: Offline

Post #164
jonbb wrote:
thank you handsome. I look at it, thank you.


LOL LOL LOL

Sorry it's not a constructive post. But as far as translated messages go, that's a winner right there!!!! LOL
Posted 14th Aug 2017 at 21:45
gnrlee Forum Admin

Location: Leeds

Registered: 20 Aug 2005

Posts: 8,882

Status: Offline

Post #165
devere wrote:
jonbb wrote:
thank you handsome. I look at it, thank you.


LOL LOL LOL

Sorry it's not a constructive post. But as far as translated messages go, that's a winner right there!!!! LOL


Laugh

________________________________________

Proud Member of the ASTOR Owners Club
Posted 14th Aug 2017 at 22:57
RallyeRed

Regular

Location: Northwich

Registered: 03 May 2016

Posts: 353

Status: Offline

Post #166
Right then, so where were we?
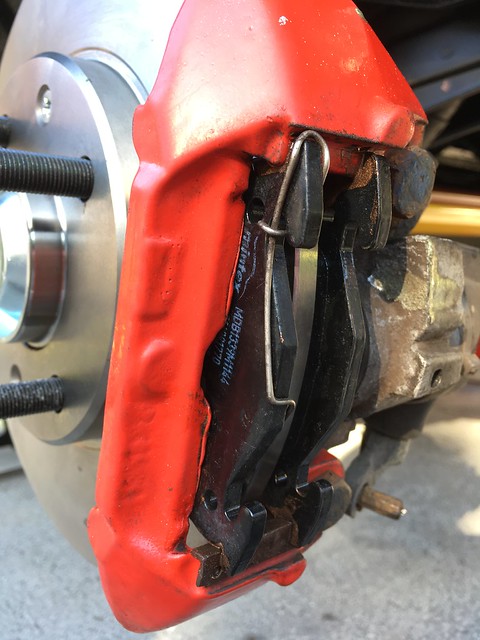
Rear brakes on, studs in and thread locked.


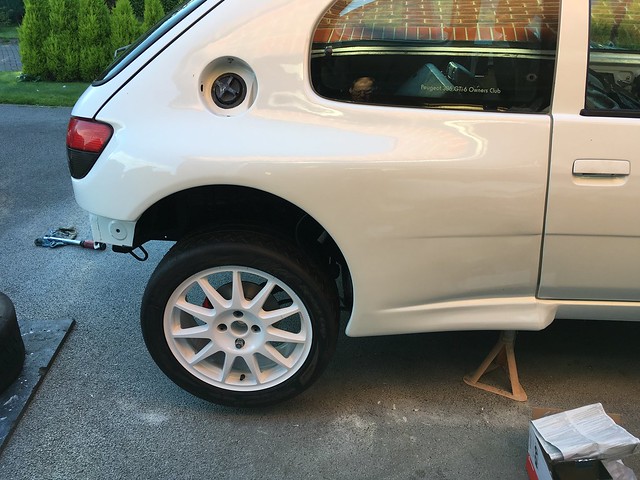
Hang a cheeky pair of wheels on for s**ts and giggles. Looks like it's mid jump..


[url=https://flic.kr/p/Xye6fx]
[/url]

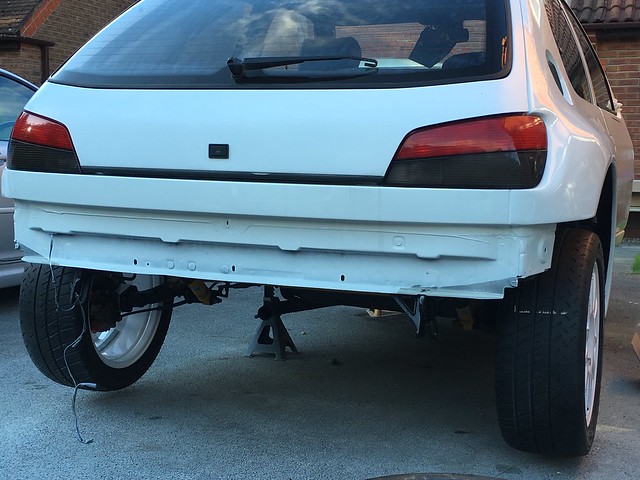
Had to resist temptation to lower the back end down to see how it looked under compression..

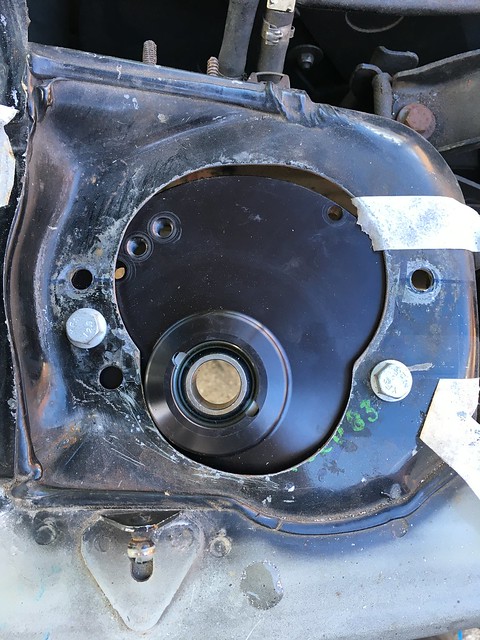
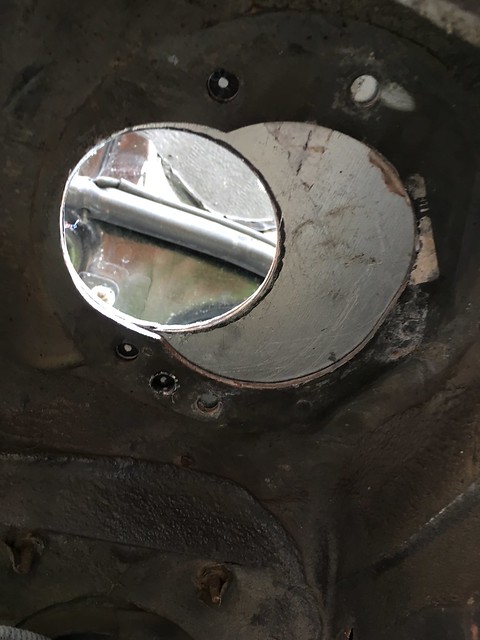
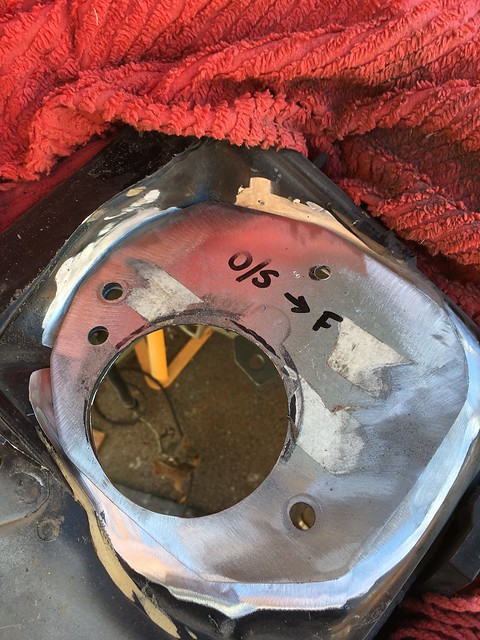
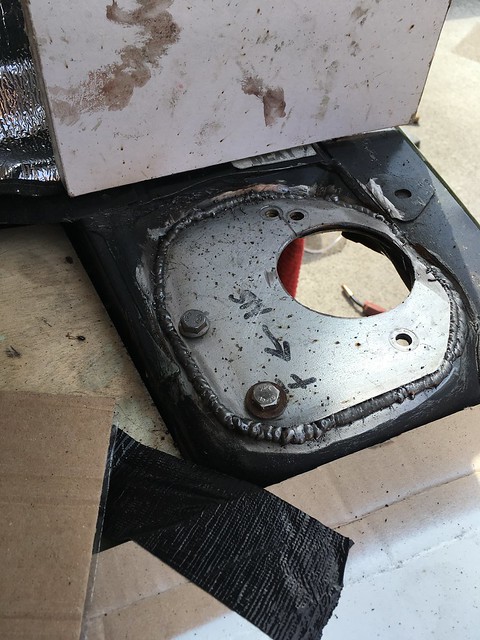
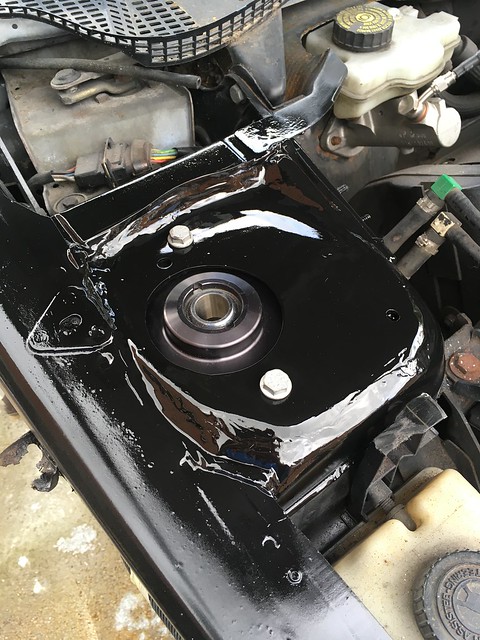
Time to sort the front end out now. Needed to start with reinforcing the turret tops. This I did with 3mm steel seem welded around the outer perimeter. Had lots of conversations about doing on top, going under etc. Had a lot more surface area on top due to the way the turret is constructed, plus there's still a fair bit of the original turret top held in a sandwich between the top mount and the new turret top.

A rough approximation of the top mount in the existing turret top, which had been cut out for the extra track required. (It didn't quite end up in this spot, but shows the cut)


From underneath, with the new turret top overlaid


Upper side laid on, ready to start welding.


Pic of the NS one welded up


Used Zinc 182 primer, then rust proof chassis paint, then top coats, then oil and heat resistant lacquer on these! Then fitted the top mounts. Something else ticked off the to do list, and something else off the bench in the garage and on the car.


[url=https://flic.kr/p/XN5PiK]
[/url]

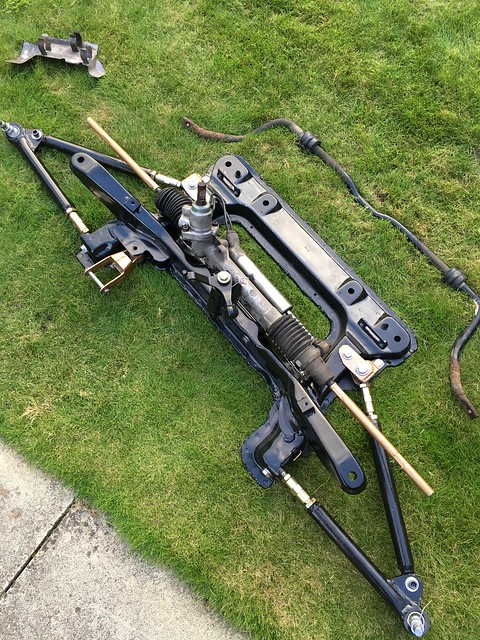
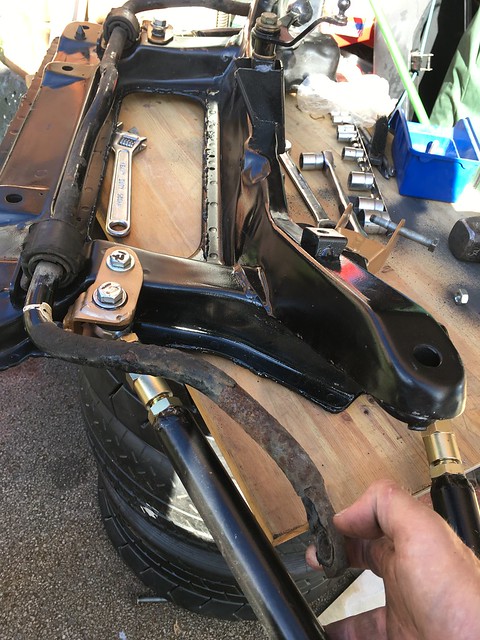
Somewhere along the line in the last few weeks I built up my subframe and wishbones. Confirmed I definitely won't be trying the OEM ARB in this initial evolution, and I don't want to mount it below the compression strut either. Will look at another solution once I decide if I need to run one.


Where the ARB wants to be, is where the comp strut is..


The plan is to lift the subframe in position once I have sorted the VTS ph2 rack plumbing.
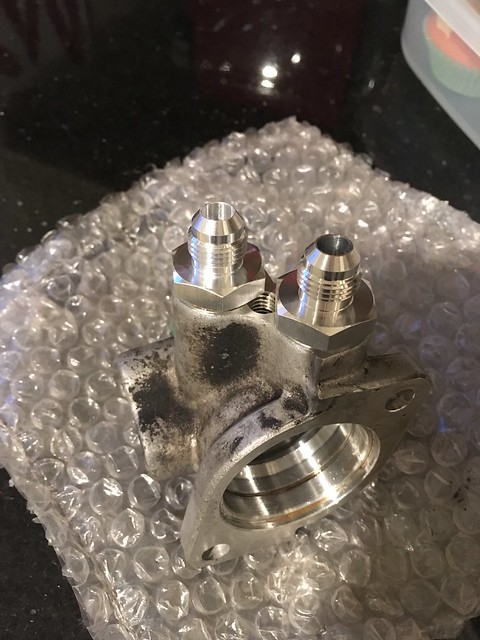
The standard hose arrangement all around the sump and subframe is a joke so I have no intention of using the ph2 plumbing for the push fit connections in the rack. Especially as the PAS pump is relocated in the normal spot.

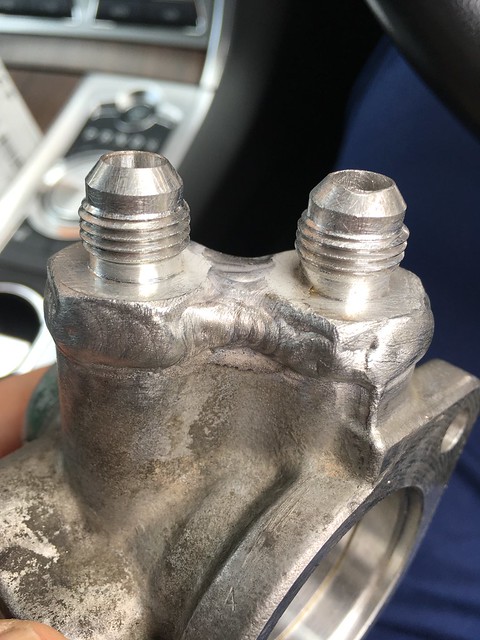
Instead I am getting these little fellas welded in and should be able to collect them tomorrow.


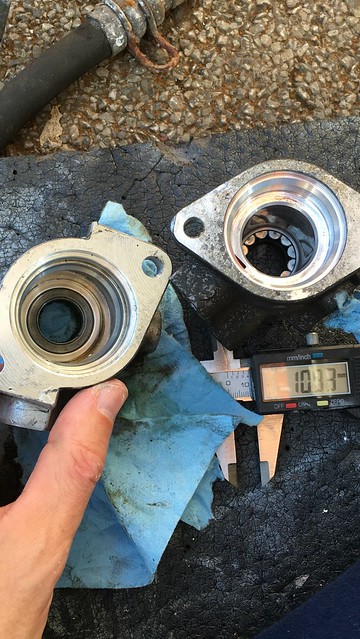
Wayne's going for the thread tapping option for a similar solution, so we'll see how both options work out. I did try and swap over the PAS pinion housing with the GTI6 one in order to retain the threaded fittings, but they don't swap. Looked close for a moment, but would have been more difficult for little gain.


Once I get the housing back welded up, I can look at making up hoses, or maybe getting some made to spec, with a shorter run to the pump with any luck.

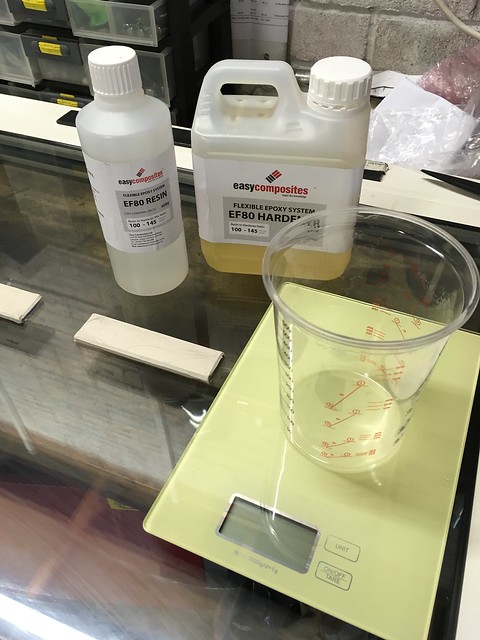
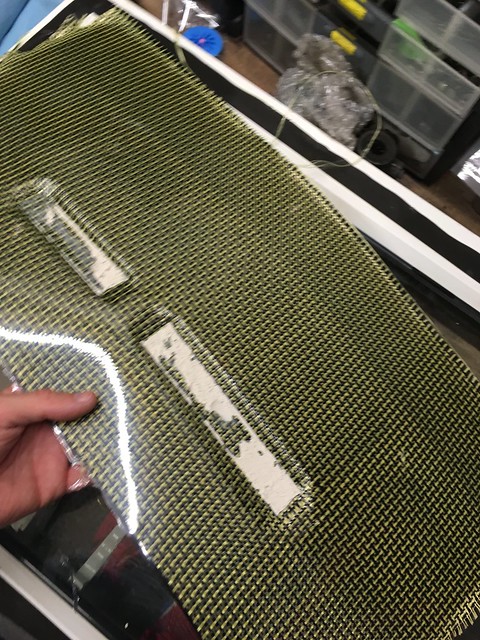
Also been making some carbon kevlar stone guards for inside the rear arches. Thought I'd try an epoxy resin with more flex built in and see how it was. Laid everything up on glass and used plasticine to build in some relief into the panel to control where it flexed.


[url=https://flic.kr/p/WHprP4]
[/url]

Turned out well..


You can see the flex in the panel. This was straight after being pulled (hence the plasticine remnants).


Although more flexible than I would prefer (it will be excellent for the splitter if laid up two ply) it'll still work fine, and it cuts really well so I can shape it to the right dimensions. Will do something similar either out of kevlar or carbon kevlar for the other side, then go to the fronts.

I'm also assembling the bits I need to make the arch guards a la Wayne, using acrylic to mold the shape, but I'll incorporate a retaining edge and look at sealing the gap to the inside of the rear qtr panels and front wings - I'm not so weight conscious here - but also a bit wary of any movement abrading the kevlar.

Cheers for now
Iain
Posted 23rd Aug 2017 at 19:51
RallyeRed

Regular

Location: Northwich

Registered: 03 May 2016

Posts: 353

Status: Offline

Post #167
Got the PAS housing back with fittings welded on. Happy with that..


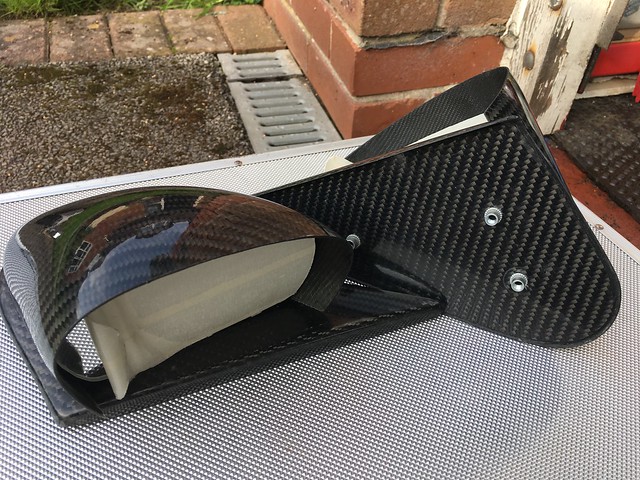
My new mirrors arrived today also - another quick turn around - only ordered them from a French firm 3 days ago. My original ones didn't fit well, so they were returned and I refunded. I was after the maxi style stalk ones after all, so started searching for some. Thought I found some (from a different supplier), duly purchased and then these arrived!


It's like a higher power is determined I'm not to have the mirrors I order! My first thought was that I had been sent the MC racing ones and I had the same type all over again, but these are different, probably the AC Sport ones. As I've mentioned before these are quite common on the F2000 - 14 class cars as well as finding their way on to a few original cars.

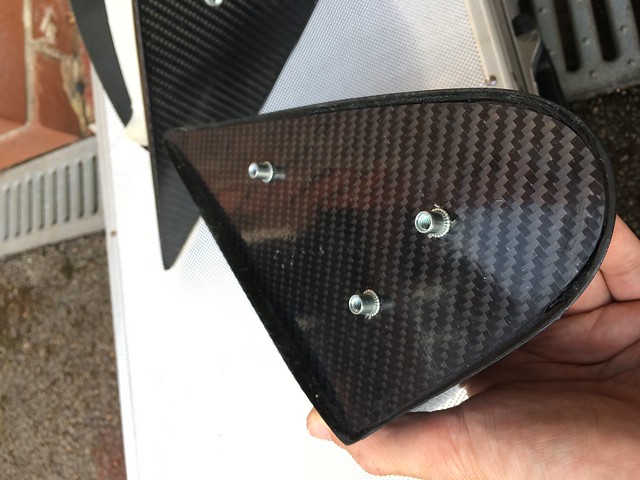
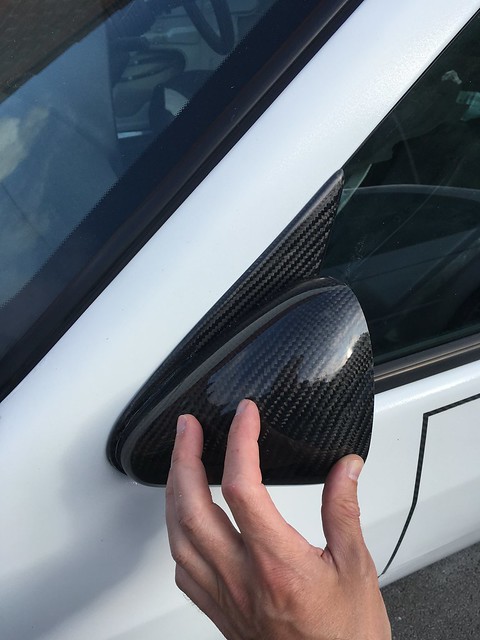
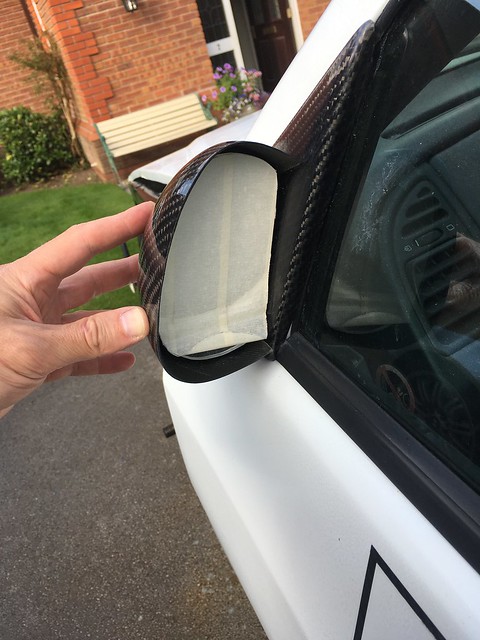
Initial look at these was quite encouraging; the quality is v high, they are light, and they fit really well, so it looks like they're keepers!


Three fixings instead of two and they line up well with the door.


So I thought I was buying cheap GRP stalk mirrors and ended up with carbon fibre F2000 ones. Happy days
Posted 24th Aug 2017 at 22:56
jord294

Seasoned Pro

Location: somewhere in north wales

Registered: 09 Nov 2009

Posts: 3,110

Status: Offline

Post #168
Coming on nicely Thumbs up

________________________________________

FRESHLY RE-FURBISHED GTI BEAMS
FITTING AND LOWERING AVAILABLE.
ALL AXLES BUILT USING GENUINE PEUGEOT PARTS

IF I'M NOT HERE, IT ONLY MEANS ONE THING.... I'M SOMEWHERE ELSE!
Posted 25th Aug 2017 at 08:44
marksorrento205

Seasoned Pro

Location: Airborne in the lanes

Registered: 26 Aug 2008

Posts: 2,223

Status: Offline

Post #169
Love this car. It's looked s**t hot Iain!

________________________________________

How to do a clicky: [url =http://www.306gti6.com]click here[/url] remove the space between [url & =
Posted 25th Aug 2017 at 21:15
RallyeRed

Regular

Location: Northwich

Registered: 03 May 2016

Posts: 353

Status: Offline

Post #170
Thanks for the comments Gents; Mark your car is looking good!

Had a full day on the car today. Been collecting a few bits and bobs too, and getting a few jobs done.
I had hoped today would be putting the rack on the subframe now I've got the AN fittings done (and also the longer GTI6 track rod arms on in place of the VTS ones) but when I saw the weather this morning I thought better of lying on my back in a puddle.

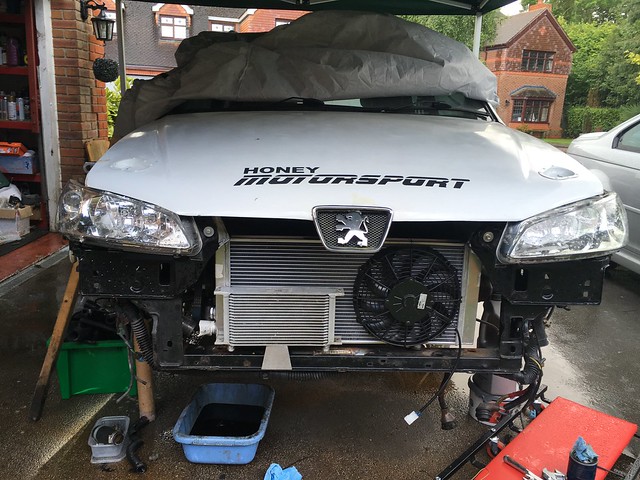
So I put the EZ up, up, and weathered the storm. Decided to focus on the new rad I've bought and look at fitment, oil cooler, fan etc and also take a look at the high pressure PAS hose from pump to rack.

This was where I started.


So old rad out, oil cooler out (doing an oil change anyway), and offered up the new rad. Just an eBay special 205GTI alloy job. The passenger side foot sits in an existing hole just inside the original, so that's an easy swap. Then line up and drill and new hole for the driver's side foot.
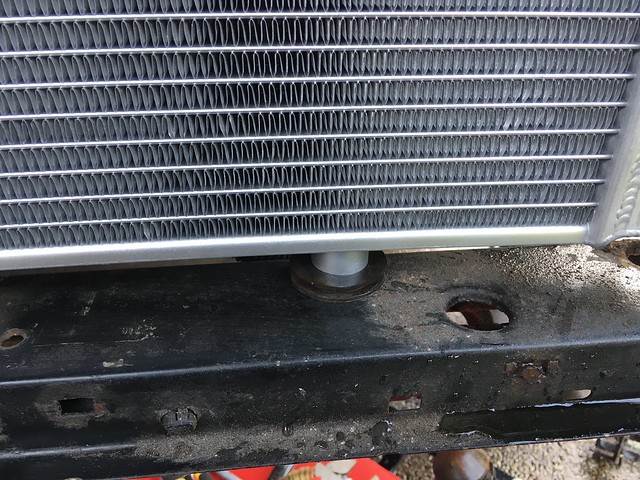


Then I looked at the mounting on the top of the rad. Obviously the slam panel is being cut out for the maxi airbox (hence the lower rad in the first place), so I will mount the rad at the side of the front cross member legs using a rubber bobbin.


Here on the driver's side I'm measuring up the gap from side tank of the rad to the bobbin, and I'll ask the alloy welder I know to make some brackets on each side of the rad to fit to the bobbin.

Also on the rad, both the inlet at the top and outlet down the bottom are 32mm. My hoses are 38mm Spoox jobs, so I need to make the two meet. I'd also quite like to get rid of the 90 deg bend in the inlet, and just have it straight to the hose. I looked into some other bits and bobs I had lying around to see if it would fit, and hose joiners etc but if I can weld on an alloy 38-32mm reducer to each outlet then all I need is to join my existing hoses up. Car builder solutions do them, so that looks like the best bet if the alloy is sufficiently good to weld.
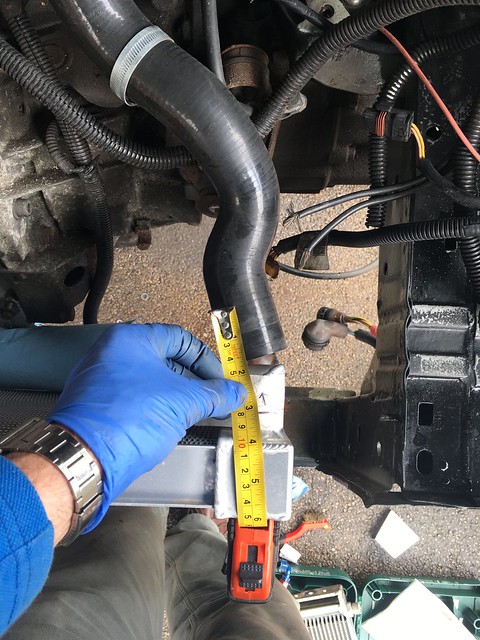
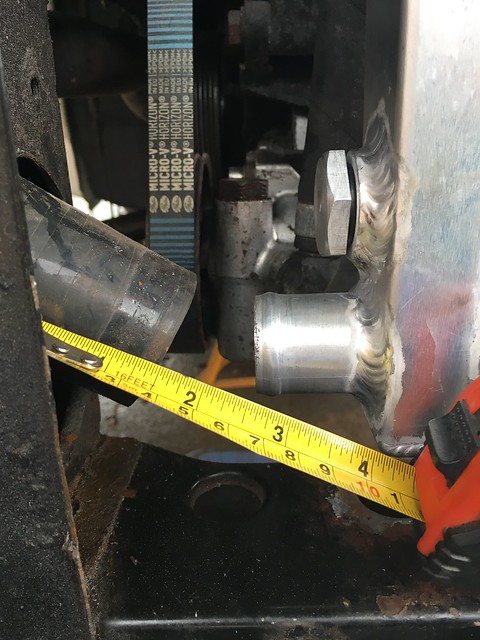


So at this point I was offering up the new 10" Spal fan, etc to see how it would all fit. I chopped the slam panel, and just happened to find a nearly new 19 row Mocal oil cooler in a box of bits in the garage as you do, so my old 16row cooler is now redundant. This was an initial look;
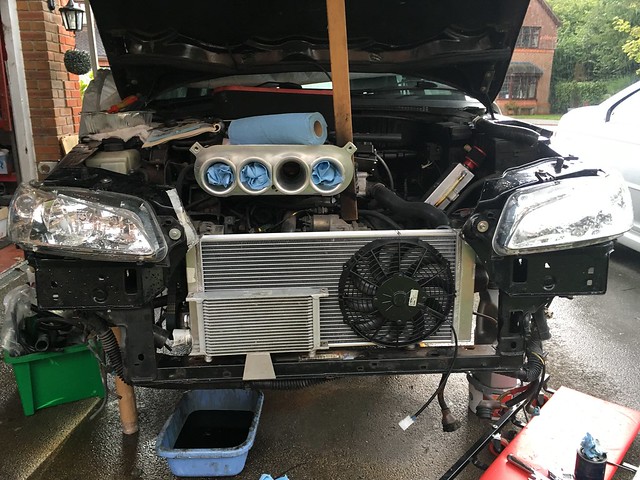


Basically happy with that, but proceeded to try all sorts of cooler positions looking at the combo of hose access to the sandwich plate along with bracket options. It's just a little too tall to mount as I would like (like the old one), but instead of going upside down like the pic, I'll probably keep it the right way up, and I think some brackets of the front cross member will do fine.

So now turned my attention to the PAS hose. It always irked me how long a run the OEM hose takes under the sump etc etc, so with it being relocated anyway, I wanted to look into a doing a short run under the drivers side chassis rail like the coolant hose.

First up undid the hose and looked to see how it would bend away from the alternator belt and see if it could follow my intended path.
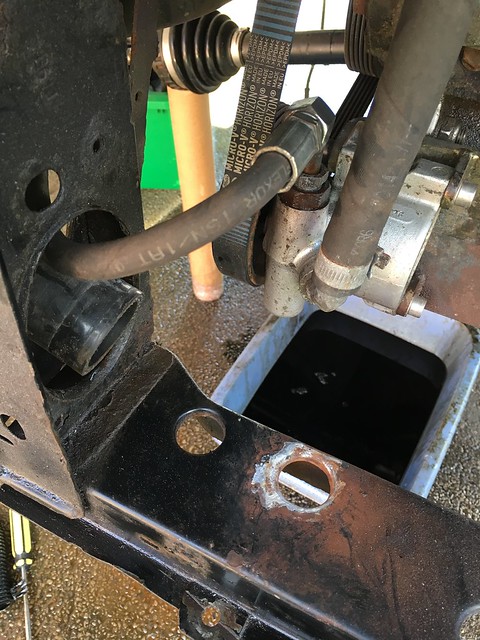


It looks do-able using this hose; although I would make it's own hole in the cross member leg by enlarging the existing one just above the coolant hose hole.

I then had a look if -6 would bend..
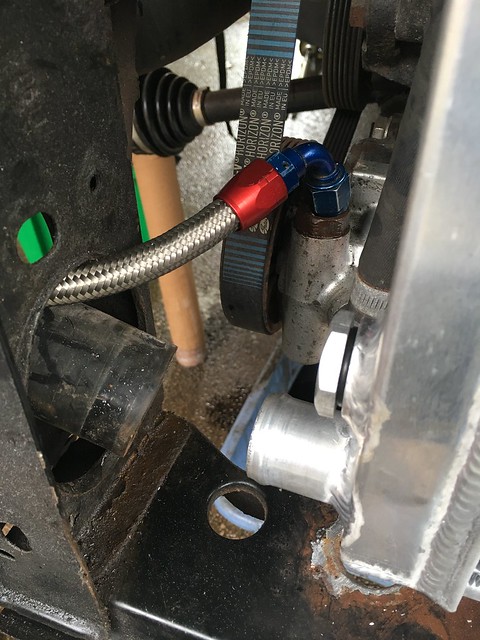


Obviously it's just offered up but I think it will do. What I'll do next is investigate if a company like Pirtek could make something with a longer custom (steel) bend in it, that would bend round tighter before joining to a hose before making it's way back to the rack.

I think I can get the rad brackets and outlets done this week, but getting the hose done is less likely.

Inevitably as the cross member and the driver's side inner arch panel are the only ones I haven't tackled yet during the project, now's the time to do a bit of de-rusting so in my last hour tonight I did a bit of sanding, (the spot welds in particular) and did some liberal de-rusting using the Bilt Hamber product again to leave it to pick up next time, with primer and paint then as the rad and hoses come together I should have everything ready.
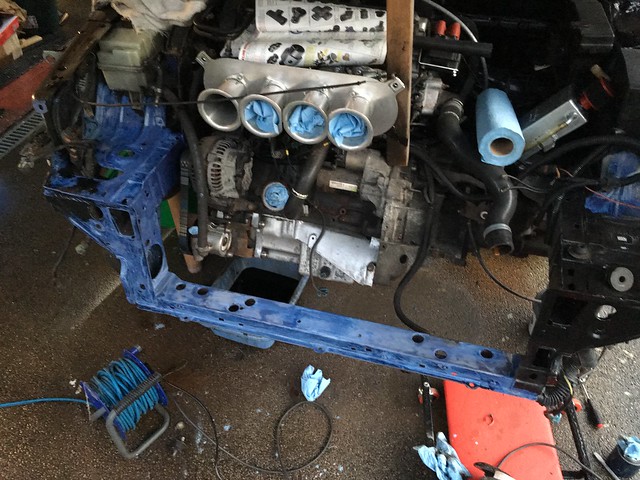


The only missing part of the jigsaw is header tank and filler hose. I'll probably get a universal alloy job. It took me a while to figure out how folk that do the 306 - 205 conversions tackle the filling from the header tank. I have seen since that Spoox even do a specific heater matrix hose with an integrated filler hose teed into it, but having seen it, I should be able to just get an alloy T piece and splice it in, and the header tank can be mounted nice and high on the bulkhead..

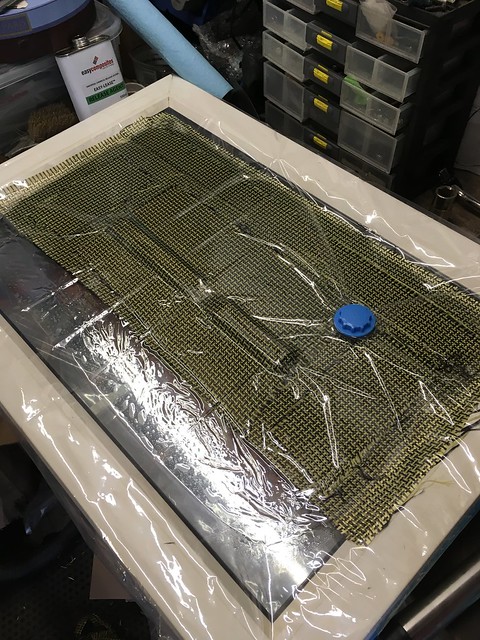
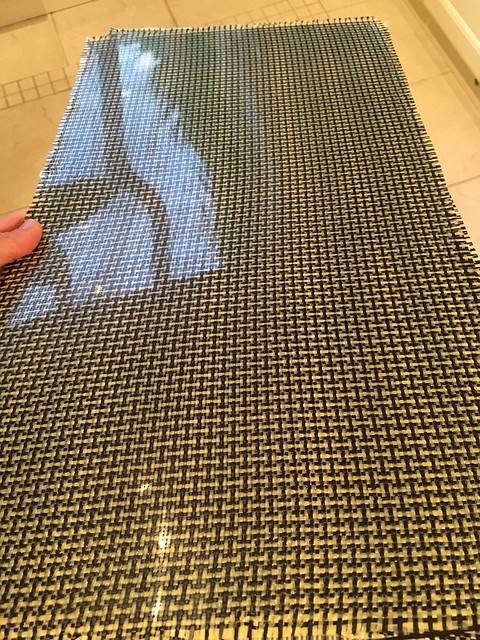
Think that's about it for now. Got a new oil catch tank from Ralloy, but not looked at fitting it yet, and also had another play with laying up some carbon kevlar for rear stone guards in the inner wings. Went the whole hog this time with peel ply, absorbant layer and vac bag with valve etc. Turned out really well, was well chuffed..
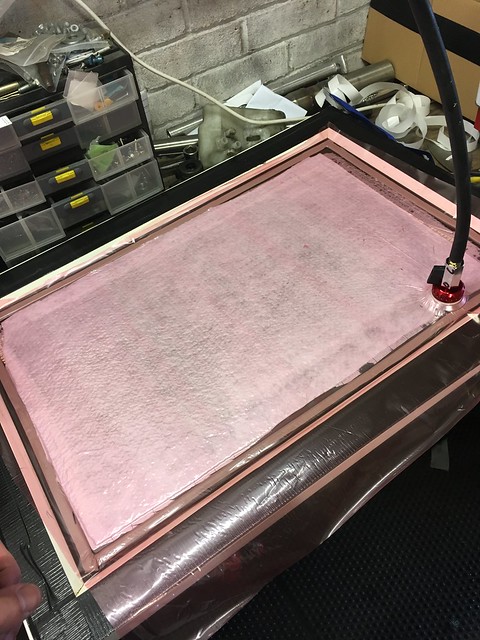


cheers
Iain
Posted 9th Sep 2017 at 23:24
devere

Senior User

Location: Saxtead

Registered: 16 Dec 2008

Posts: 810

Status: Offline

Post #171
Looks very smart. It's coming along at a good pace too!

When I fitted a new shorter rad I went for 2 fans. I originally had one front and one rear of the rad. My oil cooler is in the same place as yours. I ended up finding that the front rad actually blocked some of the cooling from air at high speeds. So ended up mounting them both on the rear.

Just thought I'd mention in case anything crops up. I don't think any fan will shift air through the rad like the wind speed at 100mph hitting the rad for example
Posted 10th Sep 2017 at 14:05
welshpug!

Capt Pedantic

Location: Bigend, Wales.

Registered: 27 Mar 2007

Posts: 25,839

Status: Offline

Post #172
there is a reason the pas hose goes underneath, the front of the engine moves far too much to have a metal pipe going from the bottom edge onto the front panel.

________________________________________

need a part number? get on here - http://public.servicebox.peugeot.com

Bring on the Trumpets.

Posted 10th Sep 2017 at 14:43
RallyeRed

Regular

Location: Northwich

Registered: 03 May 2016

Posts: 353

Status: Offline

Post #173
Thanks for the info on the fans Martin - had a long look at your cooling solution before opting for the same rad! I think there's enough room for two pullers so it'll be worth bearing in mind. I'm also hopeful that the evo 2 bumper I'm running, along with a works rad air scoop will help matters, but I'll be the first to concede the proof will be in the pudding. I only had one fan before on the Nissens rad, plus a 16 row oil cooler, so now with a thicker core rad, all the scoop-ery, and a 19 row I am hopeful!

Yep I would agree Mei on the PAS hose which is why a significant proportion of it will be flexi hose to allow for the movement. The feed from PAS reservoir must experience the same movement and they seem to hold up ok. It's worth a look I think.
Posted 10th Sep 2017 at 16:19
devere

Senior User

Location: Saxtead

Registered: 16 Dec 2008

Posts: 810

Status: Offline

Post #174
No worries. I don't know whether you saw my hose solutions at all. But I cut down a too radiator hose from a 1.8 16v 306. I just cut the ends off and used it as a push fit hose. Right diameter and went to the right places!

I then used a 90degree hose from BBM attached to the bottom of the rad. Then used an alloy joiner to attach that to a cut down standard hose coming from the rear housing on the back of the engine.

My standard rear metal pip across the back of the block was replaced with a custom made one that I had my plumber mater make up in copper. This did away with the matrix take off as I got rid of the heater. Maybe a few more ideas there!

I think I used the 1.8 16v block on the thermostat for pipes to attach to as it had one less pipe on than standard..
Posted 10th Sep 2017 at 20:29
demondriverdan

Seasoned Pro

Location: Londinium

Registered: 29 Nov 2010

Posts: 2,665

Status: Offline

Post #175
Devere, what did you use for a header tank? I'm looking at getting a smaller rad for mine so I can run an airbox but wasn't sure what to do about a header tank on a 205 rad. Was thinking about getting a Nissan one like Day666 runs as I think it has the tank built in

________________________________________

Rallye Race Car
Posted 11th Sep 2017 at 11:22

Pages (11): first .. 6 [7] 8 .. last

All times are GMT. The time is now 11:04

The Peugeot GTi-6 & Rallye Owners Club - ©2024 all rights reserved.

Please Note: The views and opinions found herein are those of individuals, and not of The Peugeot 306 GTi-6 & Rallye Owners Club or any individuals involved.
No responsibility is taken or assumed for any comments or statements made on, or in relation to, this website. Please see our updated privacy policy.