________________________________________
need a part number? get on here - http://public.servicebox.peugeot.comBring on the Trumpets.


|
| Author | Subject: Goldie the track car |
 welshpug! welshpug!
Capt Pedantic Location: Bigend, Wales. Registered: 27 Mar 2007 Posts: 25,839 Status: Offline |
Post #501
Yep, add a collar or jubilee clip on the rack as a stop, youll have less resistance and a valuable part you can sell on if it still works. ________________________________________ need a part number? get on here - http://public.servicebox.peugeot.comBring on the Trumpets. |
|
|
|
 prism7guy prism7guy
Seasoned Pro Location: DoncastAAAAARGH Registered: 13 Jan 2008 Posts: 4,640 Status: Offline |
Post #502
allanallen wrote: Have you kept the restrictor in the pipe Steve? I wasn't aware there was one. I got the pump off eBay and all that came was the pump itself, a short 'U' bend on the return hose tail, a bit of the steel pipe on the high pressure outlet and a reservoir. The steel pipe had just been chopped with bolt cropped or the like. I was thinking of making some sort of flow regulator to put in the high pressure pipework. Don't suppose you know the bore of the standard restrictor off hand do you? ________________________________________ Goldie the track car. |
|
|
|
 allanallen allanallen
Seasoned Pro Location: Buxton Registered: 01 May 2007 Posts: 1,399 Status: Offline |
Post #503
From memory they have a restrictor in the high pressure hose where it goes from steel to rubber. Its a poxy little hole, around 2mm I reckon?!________________________________________ www.bridgecraftmotorsport.co.uk |
|
|
|
 demondriverdan demondriverdan
Seasoned Pro Location: Londinium Registered: 29 Nov 2010 Posts: 2,665 Status: Offline |
Post #504
welshpug! wrote: Yep, add a collar or jubilee clip on the rack as a stop, youll have less resistance and a valuable part you can sell on if it still works. Great, I'll take it off then. Since it's only really driven on the track (and the paddock), might not bother fitting the collar. ________________________________________ Rallye Race Car |
|
|
|
 prism7guy prism7guy
Seasoned Pro Location: DoncastAAAAARGH Registered: 13 Jan 2008 Posts: 4,640 Status: Offline |
Post #505
Cheers Al, i'll look into knocking up a few restrictors of varying size around 2mm and see which one i like the feel of most.________________________________________ Goldie the track car. |
|
|
|
 prism7guy prism7guy
Seasoned Pro Location: DoncastAAAAARGH Registered: 13 Jan 2008 Posts: 4,640 Status: Offline |
Post #506
I didnt bother making a restrictor for the pas, i reckon i get enough feedback through my bum and the steering wheel to be able to tell what the car is doing and what it wants to correct itself.I went to Cadwell park last week in it, only two slight issues whilst there. The first was that the n/s rear anti roll bar end plate bolt decided it didnt want to be part of the car anymore so i was basically running without any rear anti roll bar for the day, it gave some interesting handling.  The second only occurred at the end of the day, the alternator decided to pack up. I managed to drive it home, it turns out it will run intermittently if i keep the engine revs above 3,500rpm. The alternator is now off at the supplier where they will hopefully fix it for a reasonable amount. Thanks to the lack of an anti roll bar the car was rolling a lot, enough to do this to the front n/s tyre   IMG_3474 by Steve Count, on Flickr IMG_3474 by Steve Count, on FlickrI got a few videos from the day, the weather was great all day, the track was a bit moist to start with but mostly dried out by dinner time, only the tree shrouded areas remained a bit slippy. From memory theres a couple of oversteery moments in Video 1 and 8 where my passengers get a little nervous.  Video 1 Video 2 Video 3 Video 4 Video 5 Video 6 Video 7 The cars in the paddock.   IMG_3471 by Steve Count, on Flickr IMG_3471 by Steve Count, on FlickrI've got a bit of footage recorded from my mates Boxster following me, when i get chance i'll get that on youtube too. ________________________________________ Goldie the track car. |
|
|
|
 pete_rallye pete_rallye
Seasoned Pro Location: Yorkshire Registered: 12 Dec 2002 Posts: 5,253 Status: Offline |
Post #507
Nice, you've done a good job on that tyre! Was that running some decent camber too? ________________________________________ Oulton Park in a BTCC 306 vid 1Oulton Park in a BTCC 306 vid 2 Lap of the 'ring |
|
|
|
 prism7guy prism7guy
Seasoned Pro Location: DoncastAAAAARGH Registered: 13 Jan 2008 Posts: 4,640 Status: Offline |
|
|
|
|
 pete_rallye pete_rallye
Seasoned Pro Location: Yorkshire Registered: 12 Dec 2002 Posts: 5,253 Status: Offline |
Post #509
Brilliant  Will feel like a different car when you get the ARB end plate back on again! Will feel like a different car when you get the ARB end plate back on again! ________________________________________ Oulton Park in a BTCC 306 vid 1Oulton Park in a BTCC 306 vid 2 Lap of the 'ring |
|
|
|
 prism7guy prism7guy
Seasoned Pro Location: DoncastAAAAARGH Registered: 13 Jan 2008 Posts: 4,640 Status: Offline |
Post #510
Yeah, i thought it felt a bit strange but its the first time i've had it on a uk track since doing the wishbones and assumed they had caused the handling changes.  I'll be at Oulton park next month to test it out again. Hopefully it will be dry so i can get one last day out of this set of tyres. This winter i think i'll be saving up for an LSD.  ________________________________________ Goldie the track car. |
|
|
|
 Cjwatson27 Cjwatson27
Seasoned Pro Location: Oxford Registered: 17 Sep 2013 Posts: 1,968 Status: Offline |
Post #511
Whats the boxter like on track ? ________________________________________ Old pugs don't die they just get faster |
|
|
|
 prism7guy prism7guy
Seasoned Pro Location: DoncastAAAAARGH Registered: 13 Jan 2008 Posts: 4,640 Status: Offline |
Post #512
It's pretty quick to be honest! He's running nokian road tyres, with a couple of suspension tweaks and doing very similar lap times to me. He's quicker in some sections whilst i'm able to pull away in others.He's just bought some KW coilovers for it and planning on getting some semi slicks for next year, so it'll be even better next year. ________________________________________ Goldie the track car. |
|
|
|
 Cjwatson27 Cjwatson27
Seasoned Pro Location: Oxford Registered: 17 Sep 2013 Posts: 1,968 Status: Offline |
Post #513
I'm thinking of replacing my celica vvti with one, ive got porsche envy sine my brother brought a 911. I know where there's a 2.7 one needing a respray i can get cheap ________________________________________ Old pugs don't die they just get faster |
|
|
|
 prism7guy prism7guy
Seasoned Pro Location: DoncastAAAAARGH Registered: 13 Jan 2008 Posts: 4,640 Status: Offline |
Post #514
I'm just encoding the video from his car following mine, should be on YouTube by tomorrow evening, they do have a nice engine note and go pretty well too!________________________________________ Goldie the track car. |
|
|
|
 prism7guy prism7guy
Seasoned Pro Location: DoncastAAAAARGH Registered: 13 Jan 2008 Posts: 4,640 Status: Offline |
|
|
|
|
 Nick.gti6 Nick.gti6
Regular Location: Newport Registered: 22 Aug 2013 Posts: 242 Status: Offline |
Post #516
Fair play I just watched that video  your car goes well! your car goes well!  Seems like you was finding it hard to put power down when I watched one of your in car videos, is it running still standard power? Most likely the arb causing the issue? |
|
|
|
 prism7guy prism7guy
Seasoned Pro Location: DoncastAAAAARGH Registered: 13 Jan 2008 Posts: 4,640 Status: Offline |
Post #517
Yeah it's running standard power give or take a couple of bhp. I reckon it's down a bit or power after the cambelt change and changing the inlet timing back to standard, but it still goes well enough for what it is.I think the lack of rear anti roll bar definitely had a lot of influence on the amount of wheelspin, it's never been that bad before in the dry. Hopefully i'll have a proper diff fitted before next years trackdays commence.  ________________________________________ Goldie the track car. |
|
|
|
 rallyestyle rallyestyle
Seasoned Pro Location: London Registered: 23 Jul 2003 Posts: 14,990 Status: Offline |
Post #518
Cjwatson27 wrote: I'm thinking of replacing my celica vvti with one, ive got porsche envy sine my brother brought a 911. I know where there's a 2.7 one needing a respray i can get cheap Drove my dad's mildly fettled (350bhp) 07 Boxster S round Spa a few weeks ago, was very impressed  Wouldnt let me take off the traction control though Wouldnt let me take off the traction control though   ________________________________________ Just Drive It |
|
|
|
 prism7guy prism7guy
Seasoned Pro Location: DoncastAAAAARGH Registered: 13 Jan 2008 Posts: 4,640 Status: Offline |
Post #519
Nice, i'll bet that was a fun few minutes!  ________________________________________ Goldie the track car. |
|
|
|
 prism7guy prism7guy
Seasoned Pro Location: DoncastAAAAARGH Registered: 13 Jan 2008 Posts: 4,640 Status: Offline |
Post #520
Took the car to Oulton Park last week. Started the day off too wet for my worn out R888's, so first session involved an awful lot of understeer and general lack of grip. I stuck the PE2's on for the second session, found some grip as the track started turning from wet to greasy, and decided to stick the R888's back on during the dinner break. By the end of the day most of the track was dry with a decent amount of grip, except druids which remained greasy all day. In session 5 i left the pits behind a Merc C63 AMG, i was intreagued to see if i could keep with it, which i couldnt, it definitely had me on the straights  Unfortunately for me they had had a couple of off's in their previous sessions and not removed the gravel from their undertrays/diffuser, meaning my car was constantly being pelted by gravel. One left a nice spider crack in the windscreen, oh well.  Session 1 Session 2 Session 3 Session 4 Session 5 Session 6 Session 7 ________________________________________ Goldie the track car. |
|
|
|
 99rallye 99rallye
Regular Location: Hitchin Registered: 26 Aug 2009 Posts: 348 Status: Offline |
Post #521
What an awesome thread...I look forward to the next update.Where did you get the Aluminium 90° bent pipe for the air filter? It looks great and make so much sense. |
|
|
|
 prism7guy prism7guy
Seasoned Pro Location: DoncastAAAAARGH Registered: 13 Jan 2008 Posts: 4,640 Status: Offline |
Post #522
Thanks mate. Progress is a bit slow due to buying a house and all the bloody bills, but my dining room is slowly filling with shiny new parts, and i'm currently drawing up some designs for future plans.I think i got that aluminium bend off ebay, around £15 seems to ring a bell. ________________________________________ Goldie the track car. |
|
|
|
 prism7guy prism7guy
Seasoned Pro Location: DoncastAAAAARGH Registered: 13 Jan 2008 Posts: 4,640 Status: Offline |
Post #523
I was umming and aaring whether to do this update yet or not but decided i might aswell.It's still a work in progress, and won't be finished any time soon but i thought i'd stick up my progress so far. A couple of years ago i picked up an Eaton M62 supercharger, the electronic clutch type from a Mercedes. I've seen other people have fitted the snouts from other models so they can use normal pullies without too much faffing about, but me being me decided i would try and do things a little differently and keep the 'charger pretty much the same but with a direct drive pulley. I've had some belt slip issues in the past as the alternator I have had a 5 rib pulley fitted, so from the outset i decided i'd go for an 8 rib setup like i think the super high boosts have. After many hours calculating and designing i had myself some drawings for a new crank pulley, alternator pulley, and three supercharger pullies, so i have a selection of speeds i can run the 'charger at as i want to use standard internals initially until i'm happy with the setup. The smallest pulley will spin the 'charger at 14,000rpm with the crank at 7,500 rpm. Thats the maximum recommended supercharger speed, and i want to have my limiter set to 7,500 when i get it mapped. The biggest 'charger pulley should see the 'charger at 12,000rpm with the crank at 7,500rpm, hopefully this will be fine for use with the standard internals and not produce too much boost to cause detonation or anything nasty. Enough typing, i'll just stick some photos of my progress up.   IMG_3659 by Steve Count, on Flickr IMG_3659 by Steve Count, on Flickr IMG_3661 by Steve Count, on Flickr IMG_3661 by Steve Count, on Flickr IMG_3667 by Steve Count, on Flickr IMG_3667 by Steve Count, on Flickr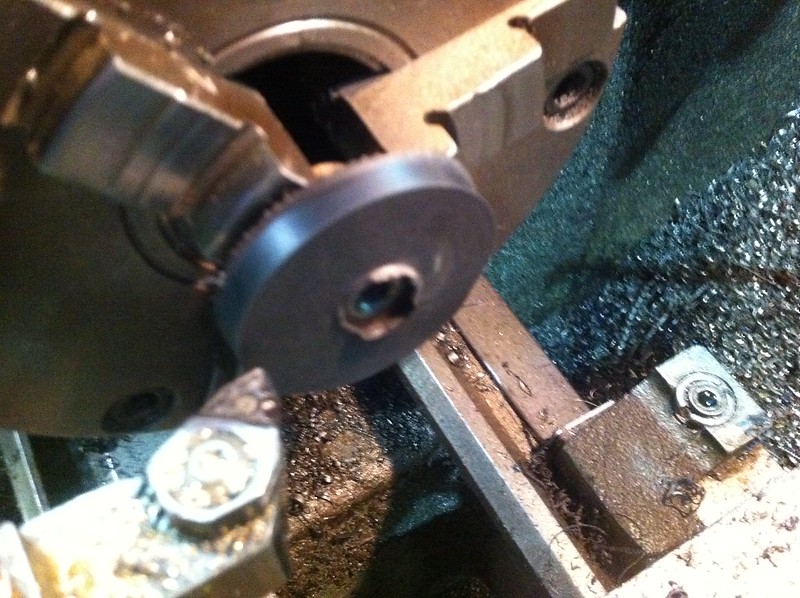 IMG_3668 by Steve Count, on Flickr IMG_3668 by Steve Count, on Flickr IMG_3669 by Steve Count, on Flickr IMG_3669 by Steve Count, on Flickr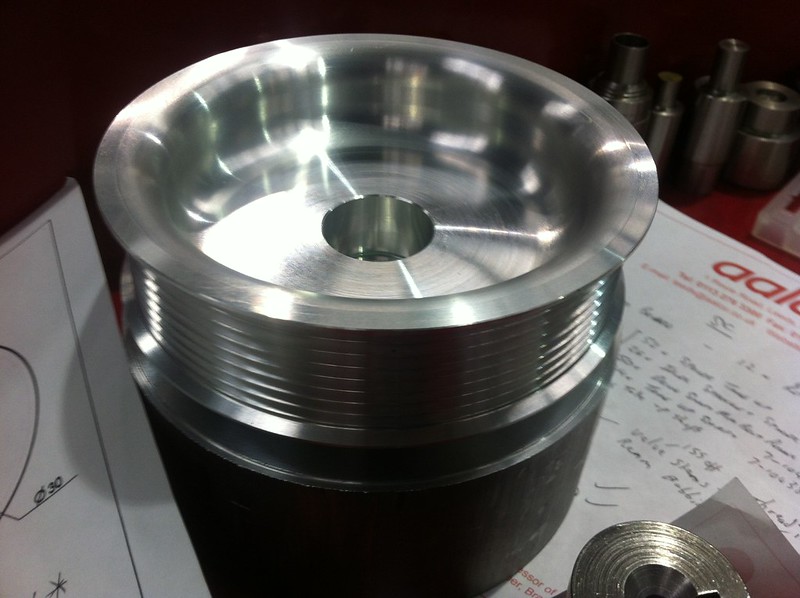 IMG_3718 by Steve Count, on Flickr IMG_3718 by Steve Count, on Flickr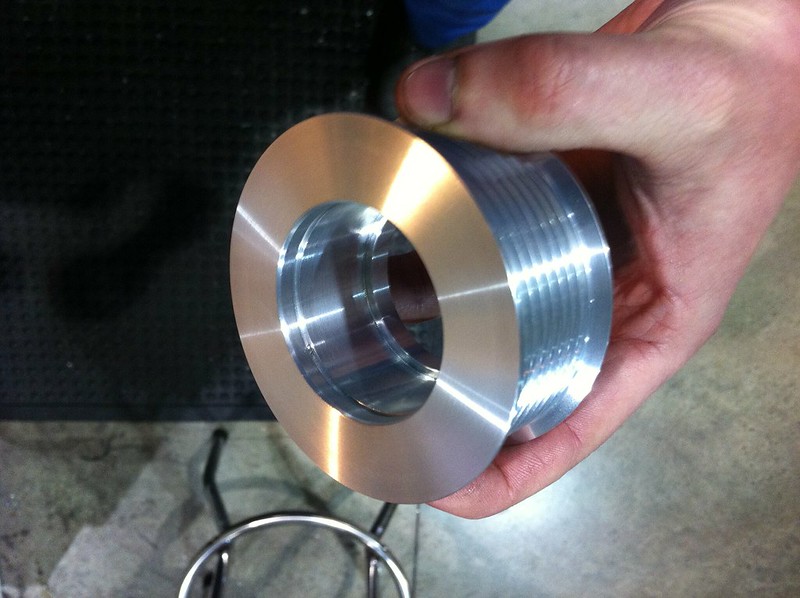 IMG_3715 by Steve Count, on Flickr IMG_3715 by Steve Count, on Flickr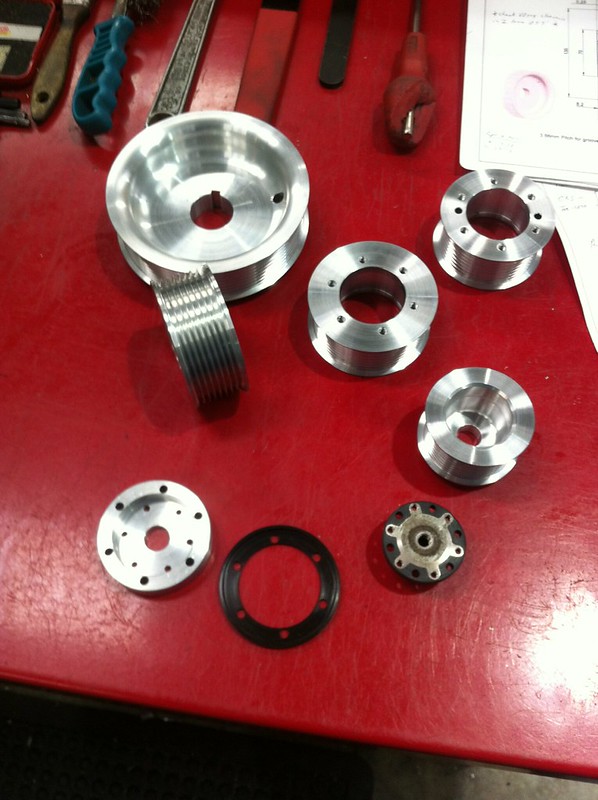 IMG_4024 by Steve Count, on Flickr IMG_4024 by Steve Count, on Flickr IMG_4027 by Steve Count, on Flickr IMG_4027 by Steve Count, on Flickr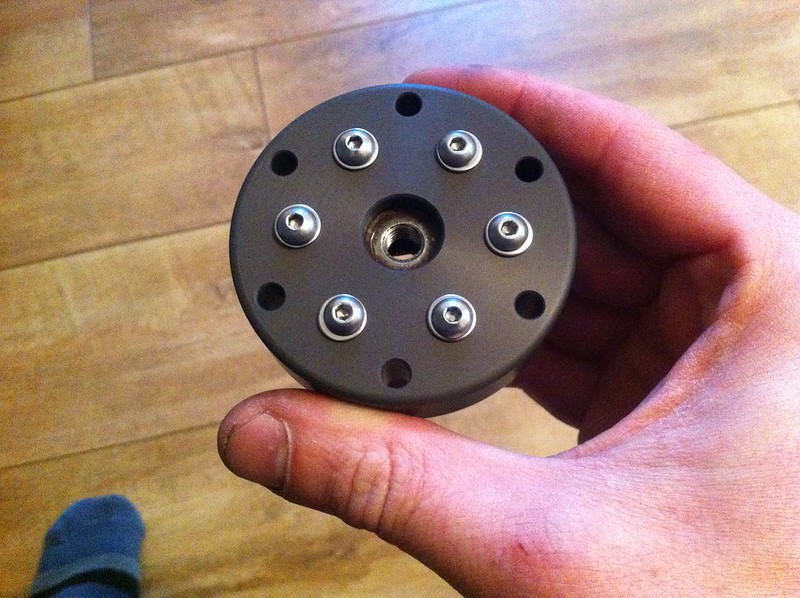 IMG_4077 by Steve Count, on Flickr IMG_4077 by Steve Count, on Flickr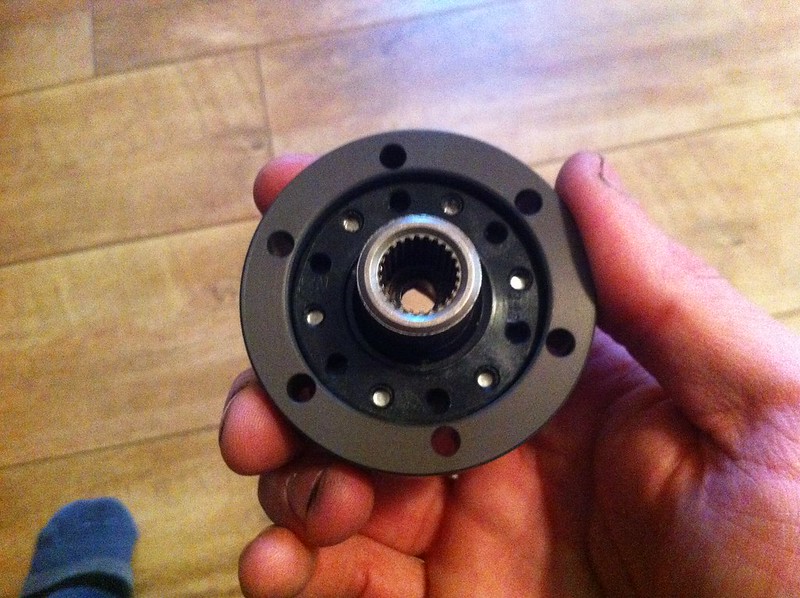 IMG_4078 by Steve Count, on Flickr IMG_4078 by Steve Count, on Flickr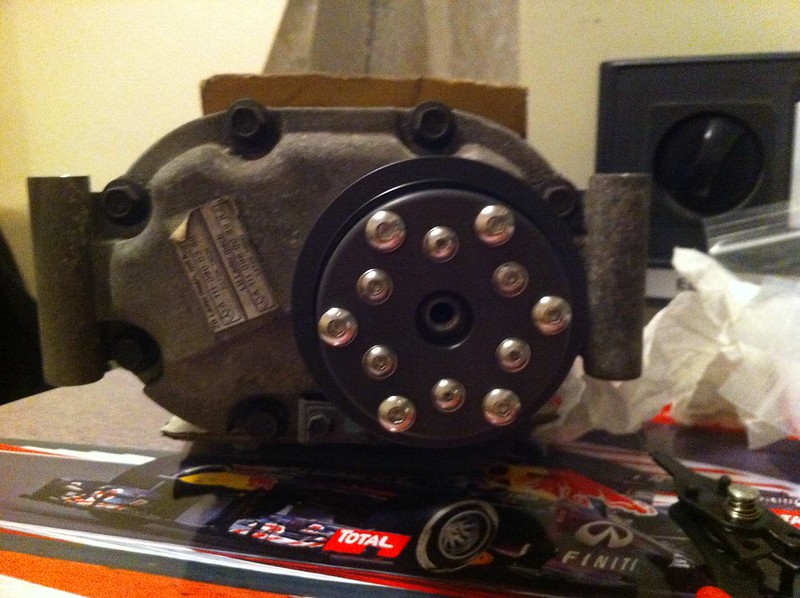 IMG_4080 by Steve Count, on Flickr IMG_4080 by Steve Count, on FlickrSeeing as i want to do as much as i can for the conversion i knew i had to sort myself out with a TIG welder, so i kept an eye on ebay and gumtree and came across a nice second hand R-tech AC/DC 201. Not cheap but it seems to be more than up to the job for what i want. Before i go any further i'd just like to point out that I am by no means a welder, so please excuse any poor welding.  Obviously the 'charger needs mounting to the engine somehow, and i've never been a fan of how big and cumbersome the nasty cast top engine mount is, so i decided to knock up some designs to get rid of all that nasty weight, and have a bracket which would also be able to hold the 'charger. After a lot of measuring and messing about with the 'charger on my spare block i had some designs which i sent off to the local laser cutters. Here's what i ended up with:  IMG_4272 by Steve Count, on Flickr IMG_4272 by Steve Count, on Flickr IMG_4264 by Steve Count, on Flickr IMG_4264 by Steve Count, on Flickr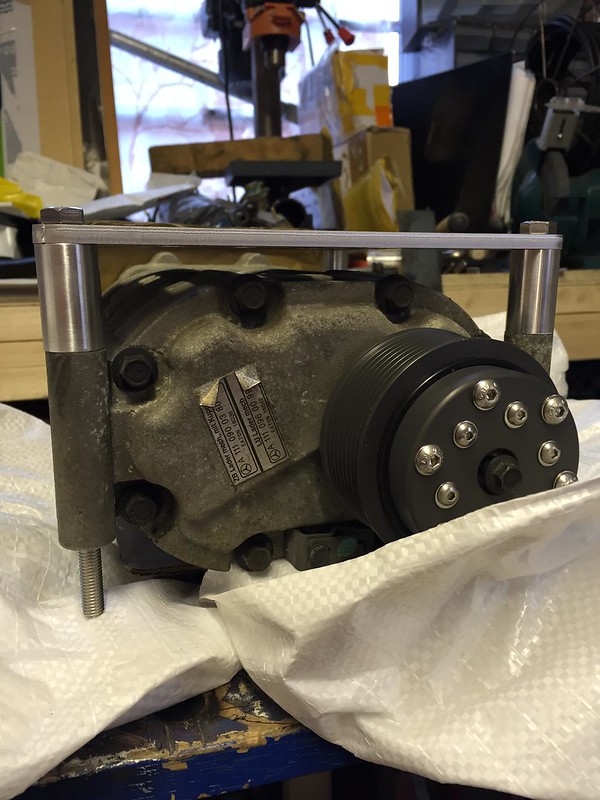 IMG_4265 by Steve Count, on Flickr IMG_4265 by Steve Count, on Flickr IMG_4286 by Steve Count, on Flickr IMG_4286 by Steve Count, on Flickr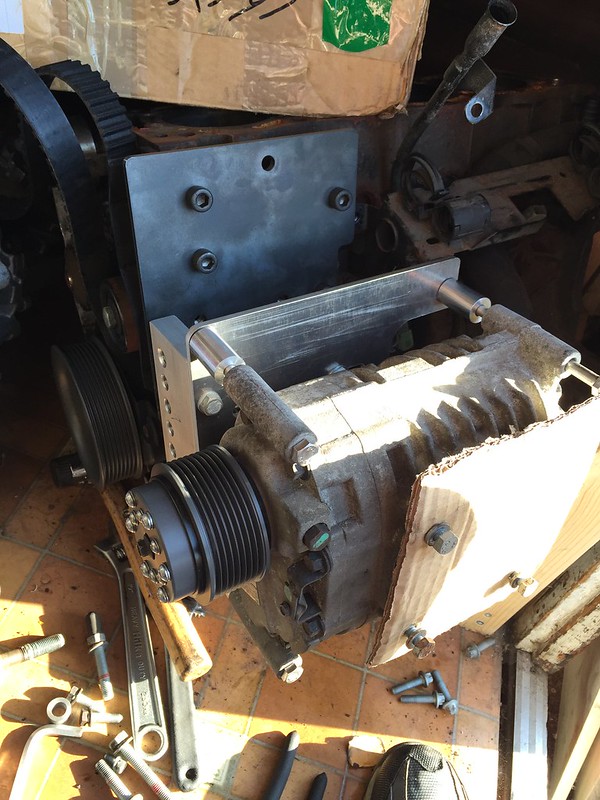 IMG_4279 by Steve Count, on Flickr IMG_4279 by Steve Count, on FlickrHad a little play with the new welder, part of the new top mount.  IMG_4118 by Steve Count, on Flickr IMG_4118 by Steve Count, on FlickrI didn't want to have a completely solid top mount so i set about knocking up some bushes that would have a bit of polyurethane in them. There isn't an awful lot due to the fact i was trying to use up some of the cds tube i bought in to make the wishbones from, only having a 24mm bore and wanting to use an m12 capscrew meant not a lot of opportunity to have much polyurethane. I bought some EasyFlo 60 polyurethane, made up the parts for the bushes and a little jig to hold it all in place whilst the polyurethane set.  IMG_4181 by Steve Count, on Flickr IMG_4181 by Steve Count, on Flickr IMG_4172 by Steve Count, on Flickr IMG_4172 by Steve Count, on Flickr IMG_4175 by Steve Count, on Flickr IMG_4175 by Steve Count, on Flickr IMG_4180 by Steve Count, on Flickr IMG_4180 by Steve Count, on Flickr IMG_4184 by Steve Count, on Flickr IMG_4184 by Steve Count, on FlickrI then decided it was time to get the engine out ready for the work to start.  IMG_4312 by Steve Count, on Flickr IMG_4312 by Steve Count, on Flickr IMG_4314 by Steve Count, on Flickr IMG_4314 by Steve Count, on FlickrProbably the most powerful dining room on the street  I noticed a small hole and crack in the exhaust manifold, i did some research and found that they are made from 304 stainless, so another little job for the new welder. I got some 316 filler wire as it was all the local welding supplier shop had in stock, and a quick google said that it's acceptable to use higher grade filler wire on lower grade welding jobs. Manifold bodged back together, first time i've tried tig'ing stainless and i don't think i did too badly.  IMG_4319 by Steve Count, on Flickr IMG_4319 by Steve Count, on Flickr IMG_4628 by Steve Count, on Flickr IMG_4628 by Steve Count, on FlickrWhilst the engine was out i took the opportunity to fit the single skin kevlar bonnet that i bought ages ago from Ash. He recommended either strengthening it with some aluminium strip or using three pins along the front. I was at a kit car show in may so decided to get another couple of pairs of aerocatches from rallydesign, they did me a very good deal on them for some reason so that was that. It will get painted to match the rest of the car but i want the car back on it's wheels before i paint it so i can use the garage as a temporary spray booth.  IMG_4616 by Steve Count, on Flickr IMG_4616 by Steve Count, on FlickrBack to the new engine mount. I chopped out the old standard mounting from the engine bay, then welded in my own strengthening plates etc, gave it some zinc primer then top coat the day after, and lacquer the day after that. 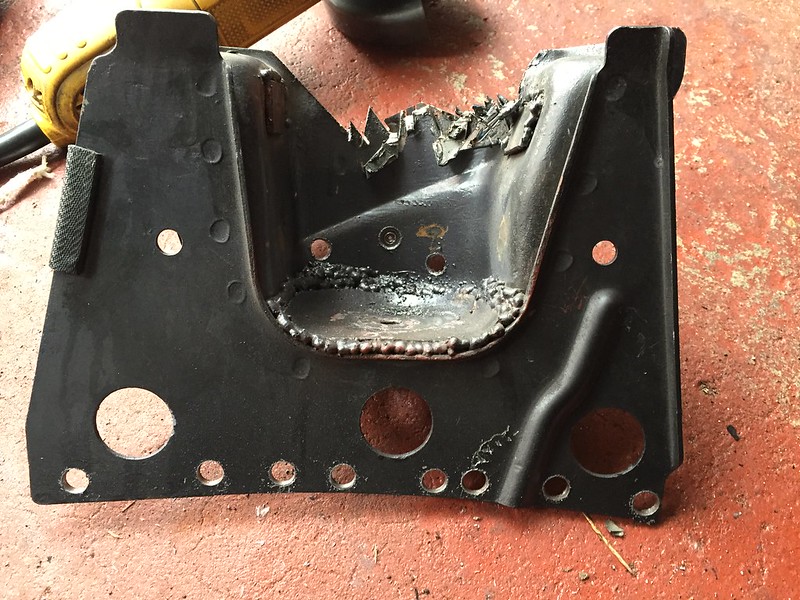 IMG_4327 by Steve Count, on Flickr IMG_4327 by Steve Count, on Flickr IMG_4330 by Steve Count, on Flickr IMG_4330 by Steve Count, on Flickr IMG_4336 by Steve Count, on Flickr IMG_4336 by Steve Count, on Flickr IMG_4341 by Steve Count, on Flickr IMG_4341 by Steve Count, on Flickr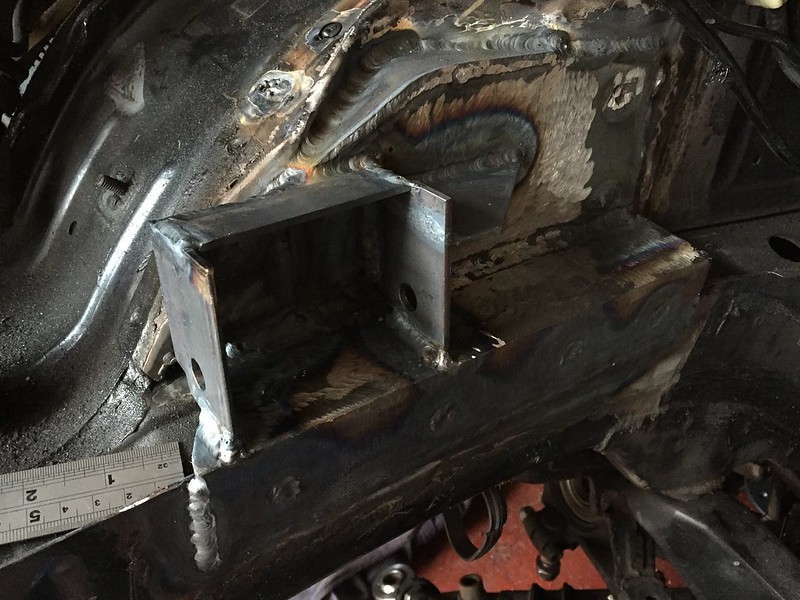 IMG_4340 by Steve Count, on Flickr IMG_4340 by Steve Count, on Flickr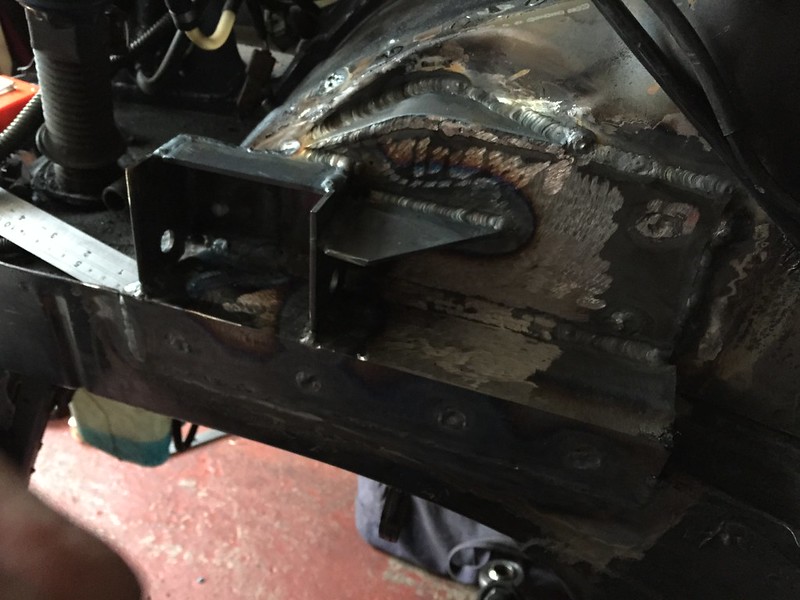 IMG_4342 by Steve Count, on Flickr IMG_4342 by Steve Count, on Flickr IMG_4348 by Steve Count, on Flickr IMG_4348 by Steve Count, on FlickrNow for the actual engine mount part, the engine was in and out several times to check positions etc and tacking bits in place before finish welding anything. Very time consuming! 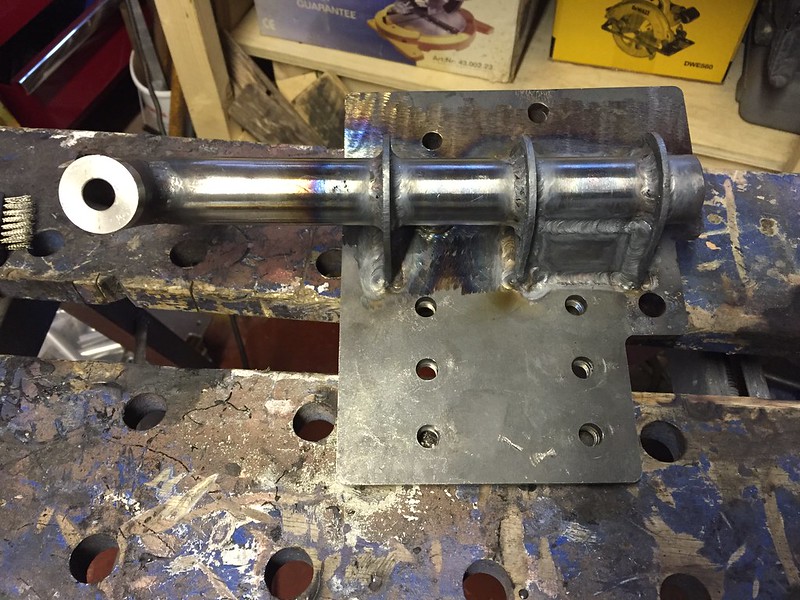 IMG_4345 by Steve Count, on Flickr IMG_4345 by Steve Count, on Flickr IMG_4347 by Steve Count, on Flickr IMG_4347 by Steve Count, on Flickr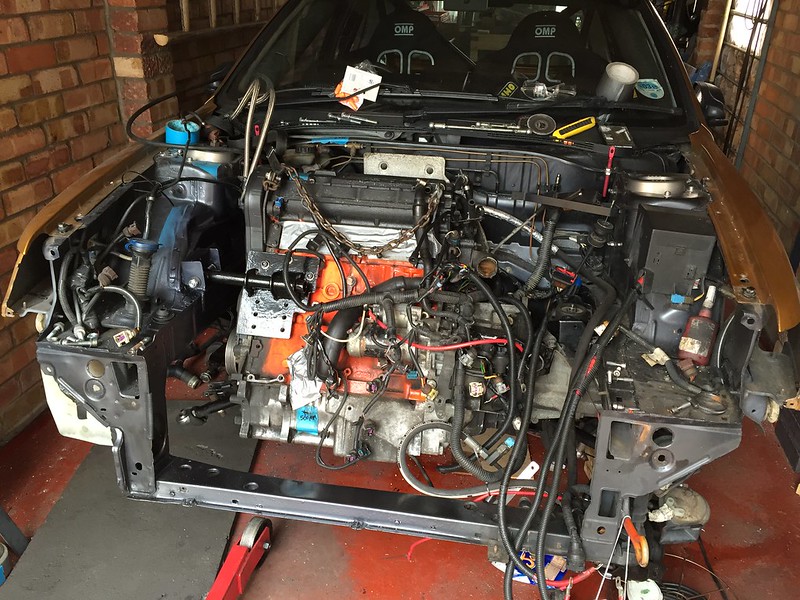 IMG_4632 by Steve Count, on Flickr IMG_4632 by Steve Count, on FlickrPretty happy with it as it is now, although i don't think there's going to be much damping done by the polyurethane.  I also made a new small bush for the bottom engine mount, the previous one that i made was a solid piece of stainless, but i wanted to allow a small amount of movement so i turned a new one out of some UHMWPE we had in at work. Once again i doubt there's going to be any real movement there but it's eased my conscience a little that hopefully i'm not going to crack the mount or anything with harsh gear changes. Whilst the engine was out i noticed the big nylon ball was missing from the standard gear selector setup, which would explain why i've been having issues selecting gears and some clunking noises. Rather than mess about replacing with standard i decided it was time to get a satchshift setup, seemed an ideal time to fit whilst the engine was out and access was easier. Unfortunately it still hasn't arrived but i did some investigation and a little guesstimation of the desired hole location through the bulkhead. I went out and bought a hole saw set to do it with and did a 32mm hole. It's 220mm up from the top of the subframe, and 90mm to the left of the reverse cable hole to the centre of the new hole. I can't say whether its in the right place until the kit arrives but it looks about right comparing to Ollies photo's of his setup. I did drop the subframe to get a better angle with the drill, god knows how others have attempted this with the engine in, or with the dash still in attacking it from inside.  I did a 6mm pilot hole first just to check it looked about right which it did, so i then went though with the hole drill.  IMG_4624 by Steve Count, on Flickr IMG_4624 by Steve Count, on Flickr IMG_4627 by Steve Count, on Flickr IMG_4627 by Steve Count, on Flickr IMG_4626 by Steve Count, on Flickr IMG_4626 by Steve Count, on FlickrIf it's not right it can always be enlarged once the new setup arrives. I removed all the old selector setup and the exhaust heatshields from the gearstick forwards, nice little extra weight loss. If i think it gets a bit toasty in the car once it's back on the road i'll probably see if i can refit some of the heatshield, or just buy some heat reflective matting and line the exhaust tunnel with that. I made a new tensioner bracket for the alternator too, still needs a lick of paint.  IMG_4654 by Steve Count, on Flickr IMG_4654 by Steve Count, on FlickrAlso made a start mocking up the 'charger positioning etc. I made the brackets so there's plenty of adjustability in terms of height and back and forth so i can get the belt lined up nicely.  IMG_4636 by Steve Count, on Flickr IMG_4636 by Steve Count, on Flickr IMG_4637 by Steve Count, on Flickr IMG_4637 by Steve Count, on Flickr IMG_4638 by Steve Count, on Flickr IMG_4638 by Steve Count, on Flickr IMG_4641 by Steve Count, on Flickr IMG_4641 by Steve Count, on FlickrI've also sourced myself a nice new radiator for a 205, got it at a bit of a bargain off ebay. It looks like it's made by Direnza. Slightly shorter than the old Nissens radiator but it's got a 42mm core so a little thicker. I'm hoping it will be up to the job of keeping the engine cool as i'm wanting to utilise a Laminova cooler to control the oil temperature rather than the twin air coolers that i had before. Due to space restraints i can no longer use the heat exchanger or have the filter down there, so i bought a take off plate and remote filter head off ebay. It's got AN10 fittings, but i'm not 100% convinced i'm happy with it as the pikey designers have made the fittings so they use what appears to be 3/4" thread, but with only a 10mm bore through them which i reckon will be a bit restrictive to the oil flow.  I've measured the old bsp fittings that were used on the air coolers and thats around 11.5mm bore. I don't think there's enough material on these new fittings to be drilled out, doing a bit of research has lead me to believe that AN10 fittings should have 7/8" thread, so the bore could afford to be bigger. As it stands i'm not sure whether to try drilling and tapping the take off plate and filter head to 7/8" and getting some proper fittings from torques, or whether to just sack this cheap chinese crap off and get some proper gear from torques.  Pic with the radiator mock fitted.  IMG_4645 by Steve Count, on Flickr IMG_4645 by Steve Count, on FlickrI need to make some extra brackets to hold it in place, and get a header tank sorted. The crossmember needed a new hole drilling to suit the rubber feet used by the old radiator, luckily my new hole saw kit came in useful again. I wouldn't mind making a swaging tool to finish the hole off but i think my boss is fed up of seeing me in the workshop out of hours.  Due to the location of the 'charger, the intake basically faces the starter motor among other things. I bought some 3" aluminium pipe off ebay, took some measurements and worked out what angle it needed cutting at so it would clear the starter, cut it, linished it until i was relatively happy, tacked it then welded it. This was the first time i've ever tried welding aluminium, so its far from neat but hopefully it's up to the job for what it is.  IMG_4657 by Steve Count, on Flickr IMG_4657 by Steve Count, on Flickr IMG_4658 by Steve Count, on Flickr IMG_4658 by Steve Count, on Flickr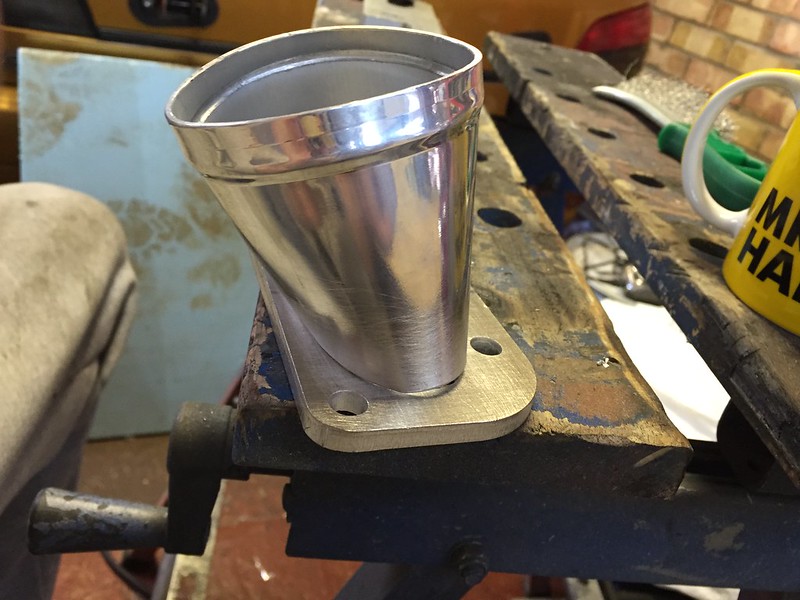 IMG_4659 by Steve Count, on Flickr IMG_4659 by Steve Count, on Flickr IMG_4664 by Steve Count, on Flickr IMG_4664 by Steve Count, on FlickrI still need to fettle where the tube meets the plate to make it smoother, but this is the general gist of how it's going to look. 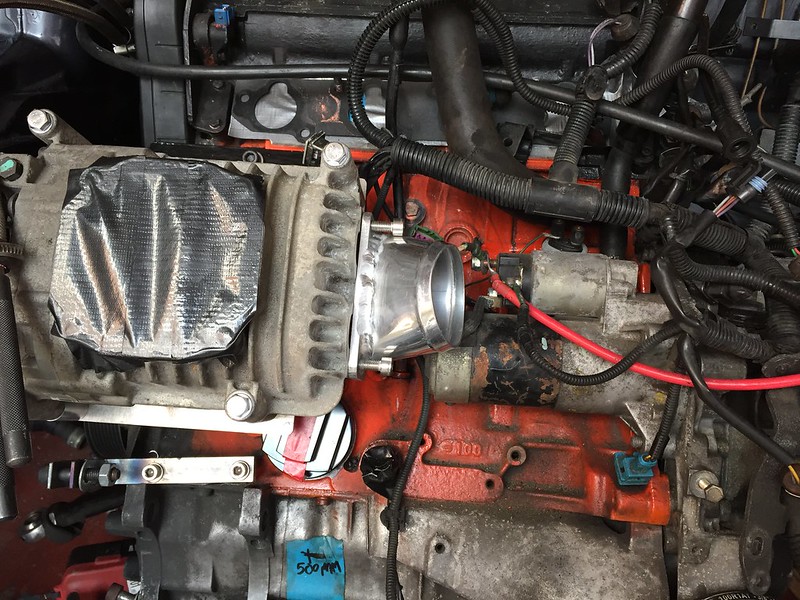 IMG_4665 by Steve Count, on Flickr IMG_4665 by Steve Count, on FlickrI'll be having two throttle bodies on the setup, one before the inlet of the charger, and one on the actual inlet manifold with a recirculating dump valve so i don't do any damage to the 'charger hopefully. It's all a work in progress still, and progress will now be slow again as i've spent up  I'll either need to source an aftermarket inlet manifold like one of RichW's, or have a go at fabricating my own. Still undecided which route to take at the moment, but the standard manifold hits the 'charger so that's a no-go. ________________________________________ Goldie the track car. |
|
|
|
 eddy_gti6 eddy_gti6
Seasoned Pro Location: Durham Registered: 20 Oct 2008 Posts: 8,716 Status: Offline |
Post #524
Nice bit progress there. Looking well and good work on the fabrication parts  ________________________________________ Clicky: [url =http://www.306gti6.com]click here[/url] remove the space between [url & = |
|
|
|
 luke306rallye luke306rallye
Regular Location: Rotherham Registered: 13 Sep 2010 Posts: 310 Status: Offline |
Post #525
Awesome work Steve, you need to make bits for mine.  |
|
|
|
The Peugeot GTi-6 & Rallye Owners Club - ©2024 all rights reserved.

Please Note: The views and opinions found herein are those of individuals, and not of The Peugeot 306 GTi-6 & Rallye Owners Club or any individuals involved.
No responsibility is taken or assumed for any comments or statements made on, or in relation to, this website. Please see our updated privacy policy.