
________________________________________
Clicky: [url =http://www.306gti6.com]click here[/url] remove the space between [url & =


|
| Author | Subject: Goldie the track car |
 eddy_gti6 eddy_gti6
Seasoned Pro Location: Durham Registered: 20 Oct 2008 Posts: 8,716 Status: Offline |
Post #276
What is that box? i dont have one on my 6? I can see loads of stuff there you dont need  ________________________________________ Clicky: [url =http://www.306gti6.com]click here[/url] remove the space between [url & = |
|
|
|
 welshpug! welshpug!
Capt Pedantic Location: Bigend, Wales. Registered: 27 Mar 2007 Posts: 25,839 Status: Offline |
Post #277
probably the electric window relay/controller thingy.________________________________________ need a part number? get on here - http://public.servicebox.peugeot.comBring on the Trumpets. |
|
|
|
 prism7guy prism7guy
Seasoned Pro Location: DoncastAAAAARGH Registered: 13 Jan 2008 Posts: 4,640 Status: Offline |
Post #278
Cheers Mei, I think thats what it's for, i looked at the numbers on the wires and looked at the wiring diagrams in my haynes manual and all the numbers i checked were related to the electric windows, so it's now in my scrap bag.Tonight I collected a pair of manual wing mirrors so i could sack off the remaining wires going into each door. The colour coded covers are a slightly different shape with one mounting clip slightly different so my old blaze covers wont fit them.  I've got plenty of spray though so i think i'm just going to paint the ones that came on the new mirrors black and bang them back on when i'm done. I did a little more wire stripping but it got dark, can anyone confirm if these two plugs are for the alarm ecu as i ditched that a long time ago and my memory isnt great.  [Image lost] It's the only thing i can think that they would connect to as i've laid the loom out on the floor and it looks like the sort of area the ecu used to live where these connectors go to. If it is for the loom it looks like i can essentially scrap the loom they are attached to as the rest just went to the doors and other un-necessary stuff. I also finished off sealing the air scoop thing, there was no water in the passenger footwell this evening so yesterdays efforts have paid off.  ________________________________________ Goldie the track car. |
|
|
|
 prism7guy prism7guy
Seasoned Pro Location: DoncastAAAAARGH Registered: 13 Jan 2008 Posts: 4,640 Status: Offline |
Post #279
Time for a little update i think.I've stripped the interior loom and dash loom, and managed over 6kg of weight saving from that.  Just the bare essentials are left in now like rear lights, fuel pump etc. I managed to snip one of the immobiliser wires when doing the dash loom, and like a genius i'd removed the wire before i noticed so i have no idea where it was leading to.  I've got the cage painted at last, here are a few snaps of it during the process.  IMG_1575 by Steve Count, on Flickr IMG_1575 by Steve Count, on Flickr IMG_1591 by Steve Count, on Flickr IMG_1591 by Steve Count, on Flickr IMG_1592 by Steve Count, on Flickr IMG_1592 by Steve Count, on Flickr IMG_1593 by Steve Count, on Flickr IMG_1593 by Steve Count, on FlickrNext i masked up the cage and started priming the interior. Time for another f*ckup though. I'd been using a mixture of holts and halfords primers which i'd had no issues with mixing together, then at a car show yesterday i bought several more cans of primer as they were only £2.50 each compared to halfrauds £6.50 cans. I got home and stuck another layer of primer on and it seems to have reacted to the halfords and holts primers. It didnt bubble up or wrinkle or anything, but sort of made it clear in patches. I left it 24 hours and have given the car another layer and not had a reaction today but the primer isnt consistent.  I think i'm going to buy a few big cans of white spray and go over the primer to get a nice consistent white before i put the bianca white over it before lacquering. Pretty frustrated with it though as its cost a bloody fortune in paint already and theres still more to buy. The only pic of the interior since priming, this was after a few cans, with one layer on.  IMG_1598 by Steve Count, on Flickr IMG_1598 by Steve Count, on FlickrWhilst the primer was left to dry today i decided to make a start on doing the aerocatch latches on the bonnet. First off i reattached the bonnet hinges, which is a bit of a pain if you try it on your own. Once i was happy with the positioning i nipped up the bolts and moved to the front of the bonnet. The rubber height adjusters were removed as thats where im going to put the aluminium pins. [Image lost] Then i closed the bonnet down and marked where the pins were on the inner skin, then re-opened the bonnet. I got one of the templates and marked out an area bigger than that to chop away at the inner skin.  IMG_1608 by Steve Count, on Flickr IMG_1608 by Steve Count, on FlickrNext i shortened the ally pin, put a small blob of tipp-ex on the top and lowered the bonnet onto it so it marked the underside of the bonnet where the pin would sit. Then i drilled the bonnet there. Lowering the bonnet back down i then did some measurements and checked that both sides were the same position. There was around a 5mm difference so i sorted that out positioning each one so they are the same and at the same angle to the bonnet, i'd already stuck some masking tape to the bonnet to mark on the crosshairs and draw the template onto ready for cutting. 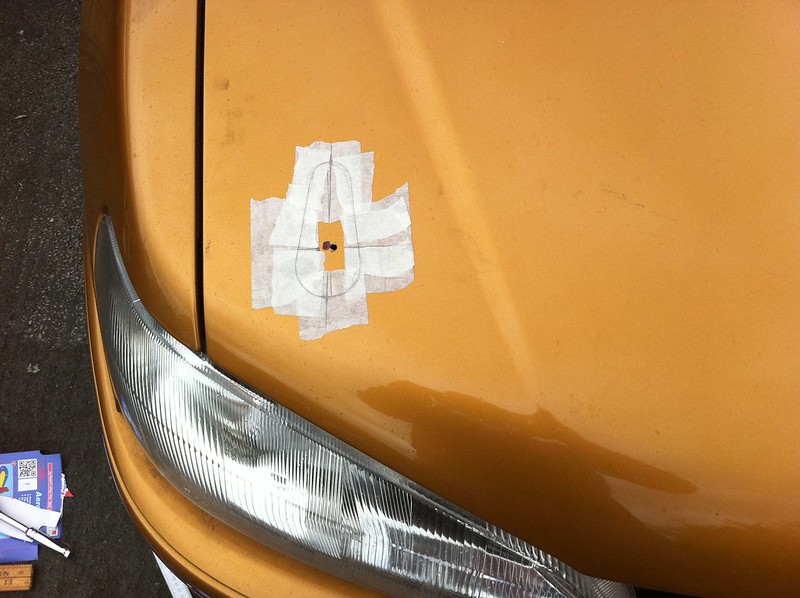 IMG_1610 by Steve Count, on Flickr IMG_1610 by Steve Count, on FlickrI just need to get round to cutting the bonnet now as it then started raining and i didnt want to get the freshly cut steel covered in water. If its not raining tomorrow after work i'll hopefully get the holes sorted. I'm going to single skin the bonnet, i'll do that when i get round to sorting the aerocatches. I also weighed some of the heater components that ive removed; 2.16kg for the box the matrix sits in. 4kg for the motor part of the box. 0.64kg for the rubber hoses to the matrix. 1kg for the matrix itself. 7.8kg in total. ________________________________________ Goldie the track car. |
|
|
|
 eddy_gti6 eddy_gti6
Seasoned Pro Location: Durham Registered: 20 Oct 2008 Posts: 8,716 Status: Offline |
Post #280
I was going to use that hole for my bonnet pin but ended up having to make a new hole further up  av lined mine so the bottom of the catch is in line with the headlight as i had my old ones fitted on my diablo 6 av lined mine so the bottom of the catch is in line with the headlight as i had my old ones fitted on my diablo 6 You keeping the car blaze or are you getting it painted? ________________________________________ Clicky: [url =http://www.306gti6.com]click here[/url] remove the space between [url & = |
|
|
|
 prism7guy prism7guy
Seasoned Pro Location: DoncastAAAAARGH Registered: 13 Jan 2008 Posts: 4,640 Status: Offline |
Post #281
I think i will paint it a different colour eventually, but thats right at the bottom of my list of things to do at the moment. I want to get carbon or fibreglass parts before i decide to paint it, namely bonnet and boot first, maybe doors later on. I have been toying with the idea of wide tracking it but i think its an awful lot of expense and effort, so probably wont go that far with it.I'm doing my aerocatches at that angle as my theory is its the most aerodynamic i can get them, even though it will only protrude from the bonnet a little bit.  ________________________________________ Goldie the track car. |
|
|
|
 prism7guy prism7guy
Seasoned Pro Location: DoncastAAAAARGH Registered: 13 Jan 2008 Posts: 4,640 Status: Offline |
Post #282
Minor update time.After work i've had a couple of evenings on the car, i've managed to get it primed, painted and a couple of coats of lacquer on it, the weather has held me up no-end on the painting as i havent painted when its raining or looks like it's going to rain, needless to say most of the week its either been raining, or stayed dry until i get home from work then p**sed it down.  This is it pre-lacquer.  IMG_1612 by Steve Count, on Flickr IMG_1612 by Steve Count, on FlickrI've also made a little progress with one of the aerocatches. Pictures tell the story better than words so here are some of the various stages.  IMG_1613 by Steve Count, on Flickr IMG_1613 by Steve Count, on Flickr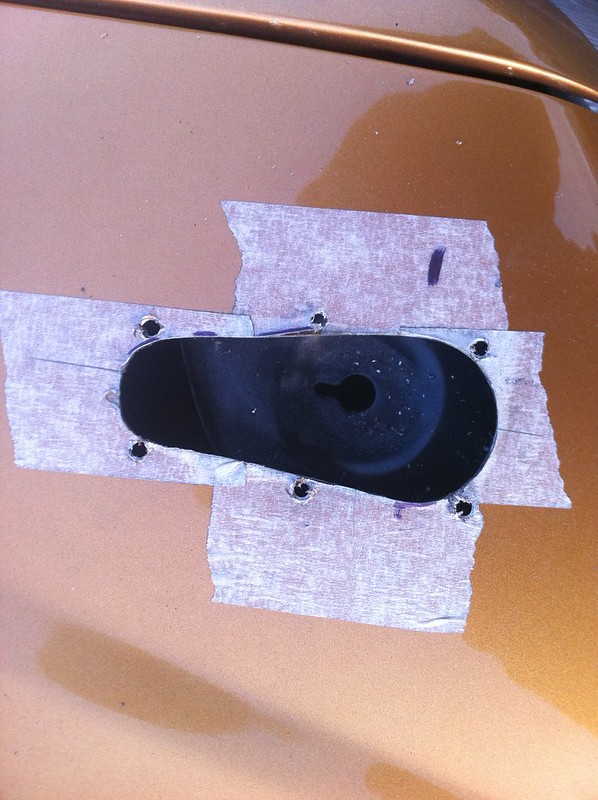 IMG_1615 by Steve Count, on Flickr IMG_1615 by Steve Count, on Flickr IMG_1618 by Steve Count, on Flickr IMG_1618 by Steve Count, on FlickrPretty chuffed with that one, just need to get round to doing the other one, hopefully the weather will pick up a bit tomorrow and i can start putting stuff back on. Here's a pic of what i did to loop the coolant where it would normally go to the heater matrix, i did just want the silicon U bend but the tails werent long enough which would have caused it to kink, so i've got an extra couple of joins, though i dont think they should be an issue really. [Image lost] ________________________________________ Goldie the track car. |
|
|
|
 Obeast Obeast
Junior User Location: LINCOLN Registered: 22 Jan 2012 Posts: 69 Status: Offline |
Post #283
ive just read through this whole thread, cracking job your doing man, and i actually like the colour blaze too!! ________________________________________ My car has 120kg of ballast- Me! |
|
|
|
 prism7guy prism7guy
Seasoned Pro Location: DoncastAAAAARGH Registered: 13 Jan 2008 Posts: 4,640 Status: Offline |
Post #284
Obeast wrote: i actually like the colour blaze too!!   Thanks mate.  ________________________________________ Goldie the track car. |
|
|
|
 eddy_gti6 eddy_gti6
Seasoned Pro Location: Durham Registered: 20 Oct 2008 Posts: 8,716 Status: Offline |
Post #285
So is this ever going to see the road again or just full on track?  ________________________________________ Clicky: [url =http://www.306gti6.com]click here[/url] remove the space between [url & = |
|
|
|
 prism7guy prism7guy
Seasoned Pro Location: DoncastAAAAARGH Registered: 13 Jan 2008 Posts: 4,640 Status: Offline |
Post #286
Hopefully be back on the roads soon, i'll probably wait until june to tax it as theres still some stuff to do to get it road worthy again. I want to keep it on the road as long as i can really as i dont have space for a trailer, or a tow car if i did have a trailer. I have toyed with the idea of buying a car transporter lorry but i imagine they are expensive to insure, and i'd have to pay to store it somewhere, and it would be boring driving that to trackdays.Just got to hope i can scrape through MOT's now with the retarded new rules. :fingerscrossed ________________________________________ Goldie the track car. |
|
|
|
 marco gti6 marco gti6
Seasoned Pro Location: Troisvierges Registered: 09 Mar 2009 Posts: 1,350 Status: Offline |
Post #287
prism7guy wrote: Hopefully be back on the roads soon, i'll probably wait until june to tax it as theres still some stuff to do to get it road worthy again. I want to keep it on the road as long as i can really as i dont have space for a trailer, or a tow car if i did have a trailer. I have toyed with the idea of buying a car transporter lorry but i imagine they are expensive to insure, and i'd have to pay to store it somewhere, and it would be boring driving that to trackdays. Just got to hope i can scrape through MOT's now with the retarded new rules. :fingerscrossed I hope so too Steve. Looking forward seeing it on the Ring  |
|
|
|
 eddy_gti6 eddy_gti6
Seasoned Pro Location: Durham Registered: 20 Oct 2008 Posts: 8,716 Status: Offline |
Post #288
Am in the same boat for mot. What you doing with the diablo then?________________________________________ Clicky: [url =http://www.306gti6.com]click here[/url] remove the space between [url & = |
|
|
|
 prism7guy prism7guy
Seasoned Pro Location: DoncastAAAAARGH Registered: 13 Jan 2008 Posts: 4,640 Status: Offline |
Post #289
The diablo is my daily driver.  ________________________________________ Goldie the track car. |
|
|
|
 prism7guy prism7guy
Seasoned Pro Location: DoncastAAAAARGH Registered: 13 Jan 2008 Posts: 4,640 Status: Offline |
Post #290
Few more progress pics.  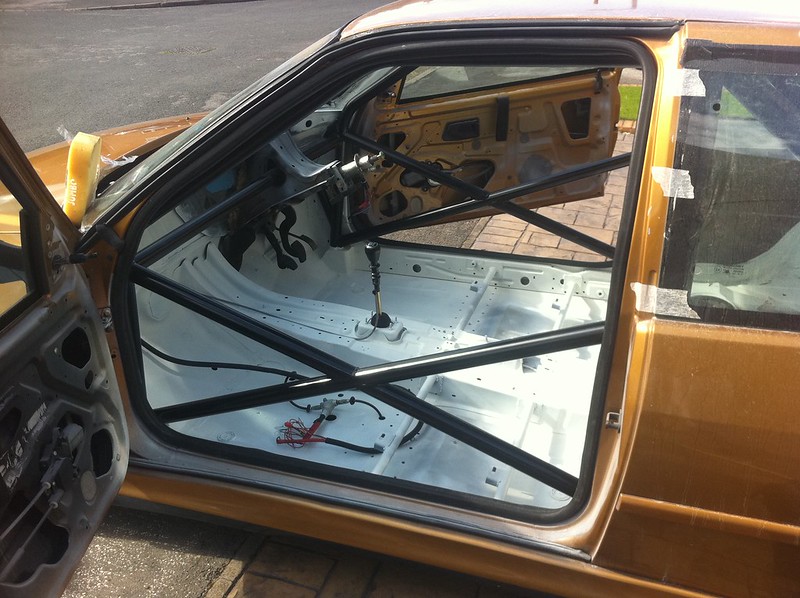 IMG_1627 by Steve Count, on Flickr IMG_1627 by Steve Count, on Flickr IMG_1628 by Steve Count, on Flickr IMG_1628 by Steve Count, on Flickr IMG_1629 by Steve Count, on Flickr IMG_1629 by Steve Count, on Flickr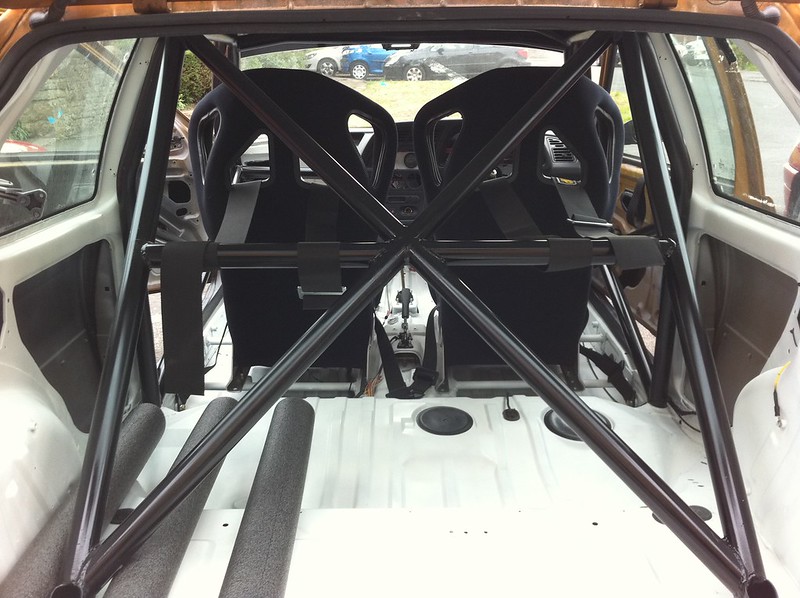 IMG_1630 by Steve Count, on Flickr IMG_1630 by Steve Count, on Flickr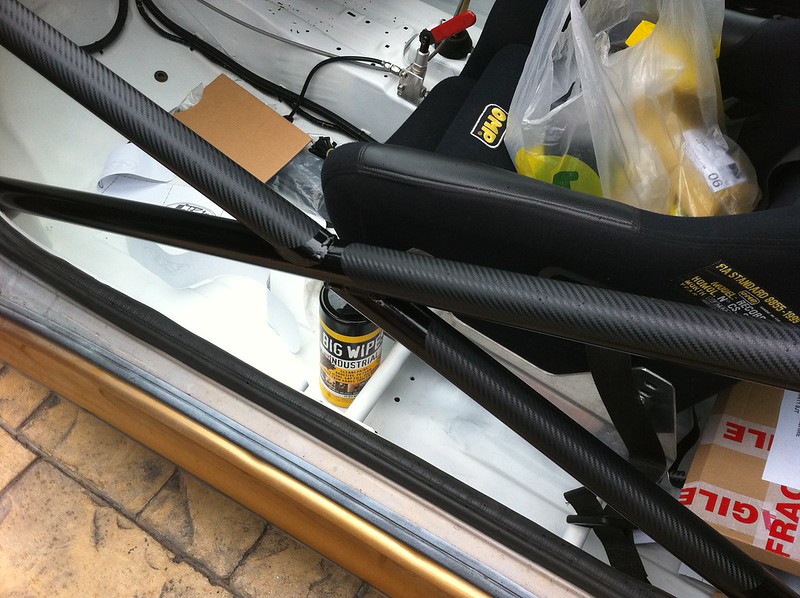 IMG_1636 by Steve Count, on Flickr IMG_1636 by Steve Count, on FlickrA bit of carbon effect vinyl to protect the door cross bars when people are getting in and out, and incase the harness buckle hits them. I'm just waiting for some quotes to come back for having my new screen fitted, though im reluctant to pay £50+vat which is what seems to be the going rate. I've just made a new earth point for the battery too and welded it on, so no more dodgy earth issues with the clocks doing their dance in the future.  ________________________________________ Goldie the track car. |
|
|
|
 clen666 clen666
Seasoned Pro Location: Co. Durham Registered: 12 Feb 2009 Posts: 2,401 Status: Offline |
Post #291
Looking awesome mate  ________________________________________ Team 'unintentional rat look' |
|
|
|
 phillipm phillipm
Seasoned Pro Location: Rotherham Registered: 15 Oct 2006 Posts: 20,607 Status: Offline |
Post #292
Now that looks tidy.Just wait until you get in with muddy feet on that white floor though....  ________________________________________ - Bespoke rollcages/additions/adjustments. Half cages right up to complete custom spaceframes - MSA/FIA spec, CDS, ROPT, T45, etc - PM meEmail me! Custom-made polybushes available - need an odd size or fitment? - anything from batch work to one-off pieces. |
|
|
|
 daveyboy daveyboy
aka Jim Davey Location: Southampton Registered: 01 Oct 2007 Posts: 8,648 Status: Offline |
Post #293
Just need to paint the rest of the car white and it will be perfect : ________________________________________ R H Davey Welding Supplies. I sell new and used welding equipment in the Hampshire area. I take on welding jobs in the evenings, ally casting repairs are one of my specialities but I can weld pretty much anything. PM me with your requirements.Some of my services: (See my for sale threads) Engine mount/chassis repair Solid Beam Mounts BACK IN PRODUCTION Harness bars |
|
|
|
 prism7guy prism7guy
Seasoned Pro Location: DoncastAAAAARGH Registered: 13 Jan 2008 Posts: 4,640 Status: Offline |
Post #294
clen666 wrote: Looking awesome mate  Thanks. phillipm wrote: Now that looks tidy. Just wait until you get in with muddy feet on that white floor though....  Thanks, the floor is already mucky so i bought some bloody heavy rubber mats.  daveyboy wrote: Just need to paint the rest of the car white and it will be perfect :  It'll be a while but i reckon the whole car will probably end up bianca white. Theres plenty of white overspray all down the sides so i'm half way there.  ________________________________________ Goldie the track car. |
|
|
|
 birk birk
Seasoned Pro Location: Doncaster Registered: 24 Oct 2005 Posts: 7,032 Status: Offline |
Post #295
Don't do it bianca, off the shelf white is really bright, not like bianca, which has yellow in it.________________________________________ Dimma + Gt35 turbo = Solid rear beam mounts £130 07889376885 Dan |
|
|
|
 phillipm phillipm
Seasoned Pro Location: Rotherham Registered: 15 Oct 2006 Posts: 20,607 Status: Offline |
Post #296
Rubber mats?!Think of the weight! Grip-tape ftw! ________________________________________ - Bespoke rollcages/additions/adjustments. Half cages right up to complete custom spaceframes - MSA/FIA spec, CDS, ROPT, T45, etc - PM meEmail me! Custom-made polybushes available - need an odd size or fitment? - anything from batch work to one-off pieces. |
|
|
|
 cjm_harris cjm_harris
Seasoned Pro Location: Parts for Sale section Registered: 04 Dec 2007 Posts: 7,442 Status: Offline |
Post #297
Looking fantastic mate  ________________________________________ Chris1999 China Gti6 Supercharged  [Fun car] >>Project Thread<< [Fun car] >>Project Thread<<2000 Bianca 306 Diesel [Work runabout] |
|
|
|
 prism7guy prism7guy
Seasoned Pro Location: DoncastAAAAARGH Registered: 13 Jan 2008 Posts: 4,640 Status: Offline |
Post #298
I was going to use grip tape but decided against it for two reasons, one is that it would look crap once someone steps on it once its been raining, and it would probably be a nightmare to stick down since the floor isnt flat where people have tried jacking up under the footwells.I've been busy this week getting more stuff done, here are some pictures of stuff i've done/fitted:  IMG_1648 by Steve Count, on Flickr IMG_1648 by Steve Count, on Flickr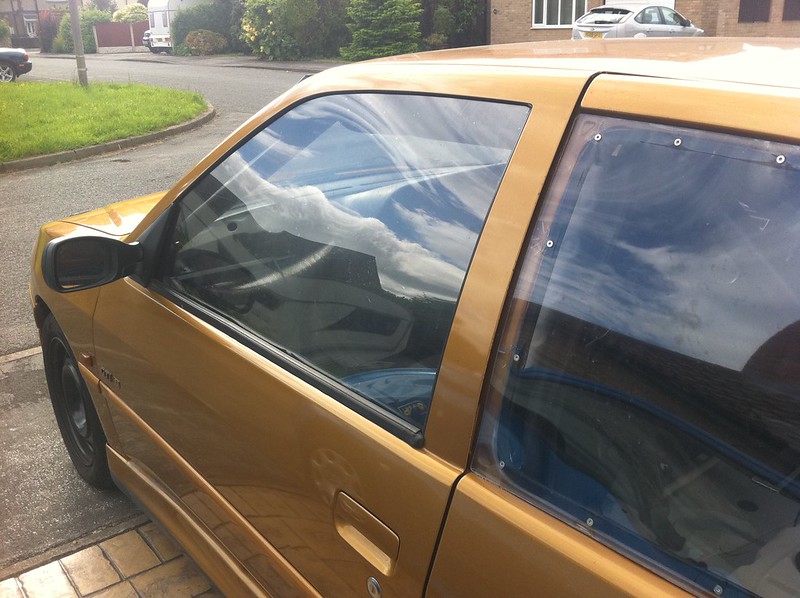 IMG_1673 by Steve Count, on Flickr IMG_1673 by Steve Count, on FlickrLexan rear windows made, piece of p*ss to make really, i drew the outline of some other polycarbonate windows i have on the sheet, then went round it with the jigsaw. I mock fitted them marking where i would need holes and drilled them. I then secured the two windows together through a few of the holes and went round them with a belt sander. Then hand sanded them for a nicer finish. Then i took them to work and countersunk the holes so that M4 countersunk bolts sit flush with the surface. Brought them home, put them in position and drilled the bodywork holes, used some rubber U channel to seal the windows. I got some light tinting film from ebay and stuck that on, using loads of baby shampoo and water on the lexan and sticky side of the film, then on the other side of the film and squeegee'd the liquid and air out. Next i just cut the film where the holes were and mounted the windows in with some nylocs. I've got some black vinyl borders ordered from Chris so the stainless countersunk bolts will then be hidden and it will hopefully look slightly more OEM style. Today i took one of the front windows out and used that as a template and cut some card to check it would be fine. Once happy with that i marked out the shape on some lexan and cut that out with the jigsaw. I didnt bother sanding the edges as none will be visible when in-place. I then used the tinting film on these too and had a nightmare on the first one (passenger side), it was quite breezy and trying to lay some film in the wind isnt too easy. I think i've got most of the bubbles out but my squeegee seems to have scratched the film quite a bit (was squeegee'ing for well over an hour as the film went on in a right state!) For the other front window i learned from my mistake so borrowed two helpers to hold the film just over the lexan, with loads of shampoo and water sprayed on the lexan and both sides of the film, i got the squeegee in the middle of the film and pressed it onto the lexan, then slowly worked out from the middle to get all the air out. This way only took 10-15 mins to do, once the film is down i went round it with a sharp blade to trim it flush with the edge of the lexan. I'm going to leave the fronts a couple of days for the film to settle as i also need to make something to hold the fronts in place which won't be visible from outside the car.  IMG_1640 by Steve Count, on Flickr IMG_1640 by Steve Count, on FlickrI've got the battery back on too, i got fed up of having to get someone to hold an allen key in the cap screws on the boot floor whilst i shuffled under the car to nip up the nylocs holding the battery tray up, so i bought some half nuts and tightened them onto the capscrews under the boot floor. Now i can just pop the battery in the tray, put a thin layer of padding on the top of the battery (sticky backed weather seal stuff), then push that up on the studs and nip up the nylocs all on my own.  I've started an undertray to go between the fuel tank and rear bumper too, still plenty of work to do on it and i've put it on the back burner for now as i want the car back on the road and i need to spend some more money on bits to mount it.  IMG_1637 by Steve Count, on Flickr IMG_1637 by Steve Count, on FlickrI want to eventually get a fuel swirl pot and second pump fitted under the boot floor so I need to be careful on how i mount the tray and how i mount the strengthening ribs. Fitted rear hatch aerocatches, idea stolen from Chris with a pug  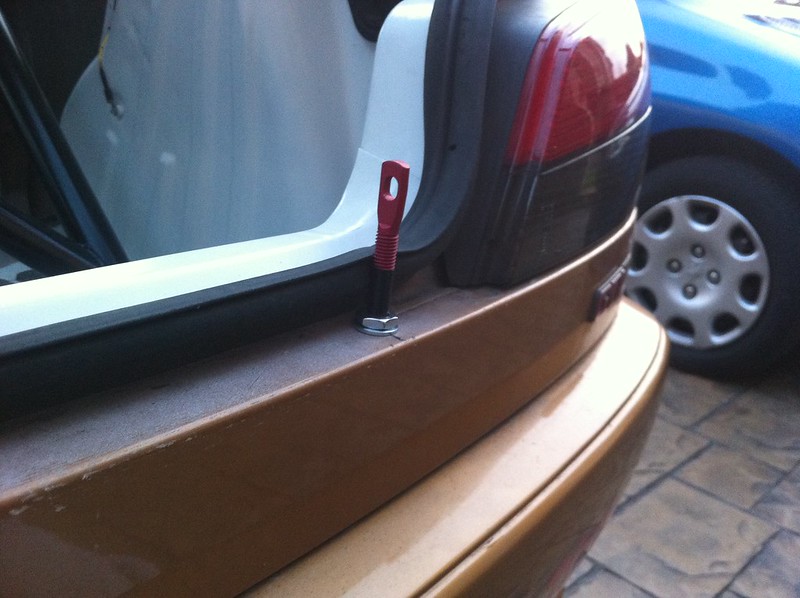 IMG_1642 by Steve Count, on Flickr IMG_1642 by Steve Count, on Flickr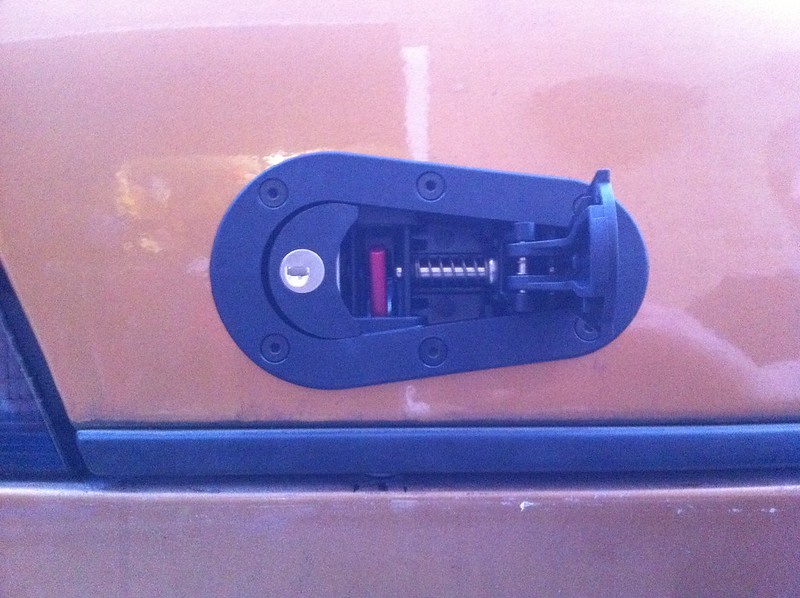 IMG_1643 by Steve Count, on Flickr IMG_1643 by Steve Count, on FlickrBought a few bits from Miles last week too, some nice new gear linkages and a BBM group N top engine mount and gearbox mount (already have a lower bbm mount from putting the engine in last year). 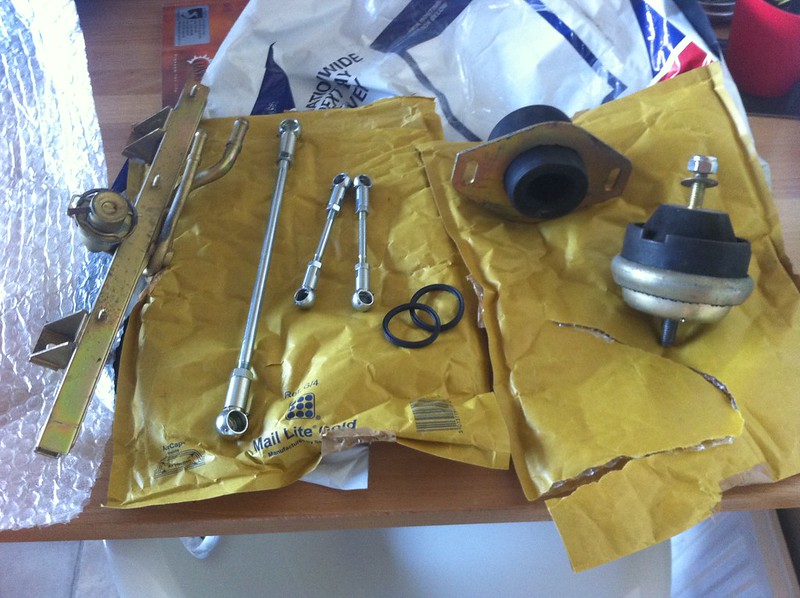 IMG_1646 by Steve Count, on Flickr IMG_1646 by Steve Count, on FlickrI had loads of oil in the coolant system from last years heat exchanger leakage, i finally decided enough is enough so bought three bottles of coolant flush. First off i just dropped the coolant then washed the system through with the hose pipe a few times. Filled up with water and a bottle of flush, ran the engine for 15 mins then dropped that. Waited a few hours for the block to cool before flushing with the hose pipe then filling it with more flush. After the second flush i destroyed the bottom hose seal so had to leave it at that, luckily a pm and phone call to Carl and the next day i had a couple of new seals and a fuel rail (the current one leaks slightly round the regulator so i need to swap that over at some point). A third flush was done and when i dropped that it was nice and clear. Now it's topped up with de-ionised water and coolant at roughly 50/50 mix. I think that's about it so far. Once the battery was back in i was nervous to try starting the car dreading that i'd have cut a wrong wire, or that the immobiliser wire that i cut would mean i'd have to unlock the ecu. When i first cranked the engine over it fired up after a couple of rotations, but only sat at around 500rpm struggling. On the second try it burst into life and has run fine ever since.  ________________________________________ Goldie the track car. |
|
|
|
 phillipm phillipm
Seasoned Pro Location: Rotherham Registered: 15 Oct 2006 Posts: 20,607 Status: Offline |
Post #299
Yeah, noticed the floor from someone jacking - I had to beat a lot of it back down to get the front feet of the cage in!________________________________________ - Bespoke rollcages/additions/adjustments. Half cages right up to complete custom spaceframes - MSA/FIA spec, CDS, ROPT, T45, etc - PM meEmail me! Custom-made polybushes available - need an odd size or fitment? - anything from batch work to one-off pieces. |
|
|
|
 prism7guy prism7guy
Seasoned Pro Location: DoncastAAAAARGH Registered: 13 Jan 2008 Posts: 4,640 Status: Offline |
Post #300
I thought it was less prominent when i got it back.  ________________________________________ Goldie the track car. |
|
|
|
The Peugeot GTi-6 & Rallye Owners Club - ©2024 all rights reserved.

Please Note: The views and opinions found herein are those of individuals, and not of The Peugeot 306 GTi-6 & Rallye Owners Club or any individuals involved.
No responsibility is taken or assumed for any comments or statements made on, or in relation to, this website. Please see our updated privacy policy.